So far in this course we have learned how to move the robot around the Minecraft world and how to rotate it horizontally. Horizontal rotation allows the robot to turn left or right and create patterns that spread across the ground.
But Minecraft is a three-dimensional world. This means we can also rotate the robot vertically. When we rotate vertically, the robot tilts upward or downward instead of turning left or right.
This new ability allows us to build structures that curve through the air. Instead of building flat patterns on the ground, we can create shapes that grow into the sky.
Vertical rotation opens the door to many exciting structures such as:
- Curved towers
- Rainbows in the sky
- Spherical objects
- Large decorative shapes
When vertical rotation is combined with loops, the robot can gradually tilt while building shapes. This allows the structure to bend smoothly as it grows.
In this section you will build several impressive projects:
- A colorful rainbow in the sky
- A spherical ball made from circles
- A giant cherry made from a ball and a stem
Each project will introduce new commands that control the robot’s vertical orientation.
Concepts You Will Learn
- What inclination means in programming
- How to tilt the robot vertically
- How vertical rotation creates curved structures
- How loops help build spherical objects
- How to combine multiple shapes into a single structure
Understanding Inclination
The angle that describes vertical rotation is called the inclination.
Inclination tells the robot how much it should tilt upward or downward before building.
For example:
- An inclination of 0 degrees means the robot builds horizontally.
- An inclination of 90 degrees means the robot builds vertically.
- Intermediate angles create diagonal structures.
By adjusting the inclination during a loop, the robot can gradually tilt as it builds.
This creates curved shapes such as arches, domes, or spheres.
The changeInclination Command
The command used to change the vertical angle of the robot is:
vm.changeInclination(angle)This command increases or decreases the robot’s tilt.
For example:
vm.changeInclination(5)This tilts the robot upward by 5 degrees.
If the robot builds a shape after this command, the shape will follow the new tilted direction.
When this command is placed inside a loop, the robot tilts a little bit every time the loop runs.
This creates smooth curves in the structure.
The setInclination Command
Sometimes we want to set the inclination directly instead of changing it gradually.
For that we use:
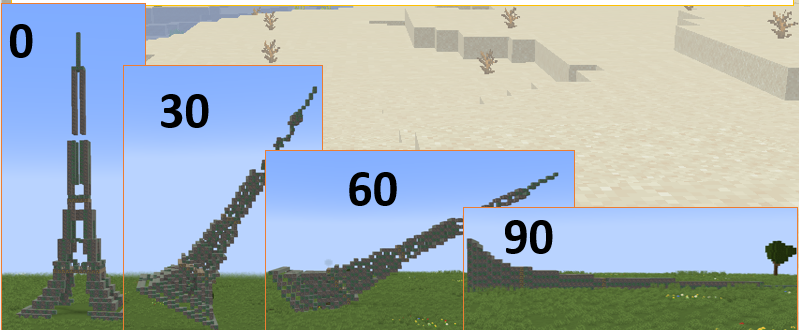
The python code is similar to the previous towers but we first change the inclination.
def tower():
  vm.setInclination(45)
  for count in range(30):
    vm.createCircle(4, False, Block.EMERALD_BLOCK)
    vm.moveTo(1, Direction.UP)
vm.setInclination(angle)This command sets the exact vertical angle of the robot.
For example:
vm.setInclination(90)This makes the robot build vertically upward.
This command is useful when we want shapes to stand upright instead of lying flat on the ground.
Combining Inclination with Loops
The real power of vertical rotation appears when we combine inclination changes with loops.
For example, imagine creating a circle.
If we slightly tilt the robot after creating each circle, the next circle will appear at a different angle.
Repeating this process many times can form a sphere.
This technique allows us to build objects that would normally require thousands of individual blocks.
The robot builder performs the entire construction automatically.
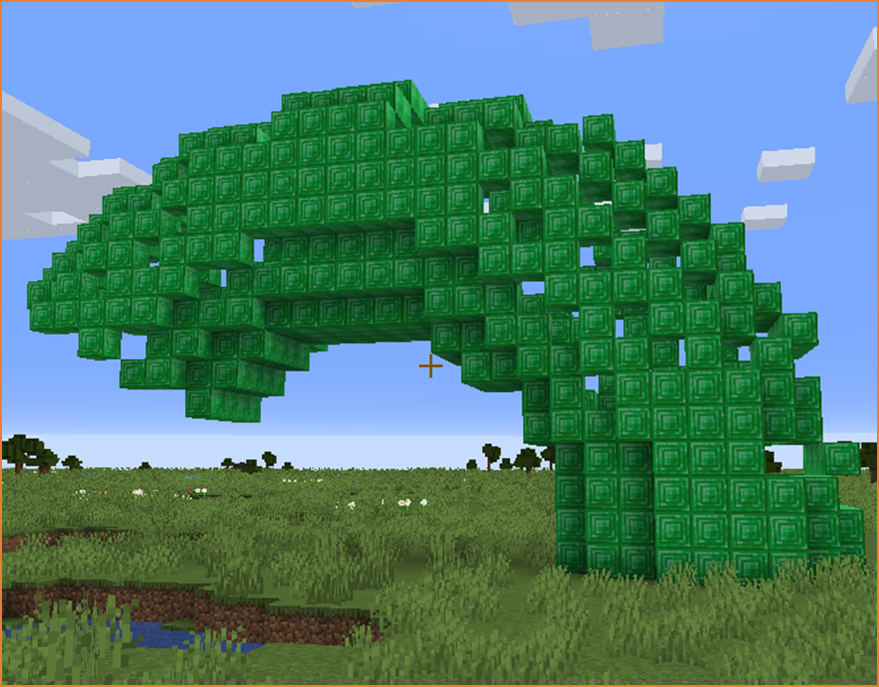
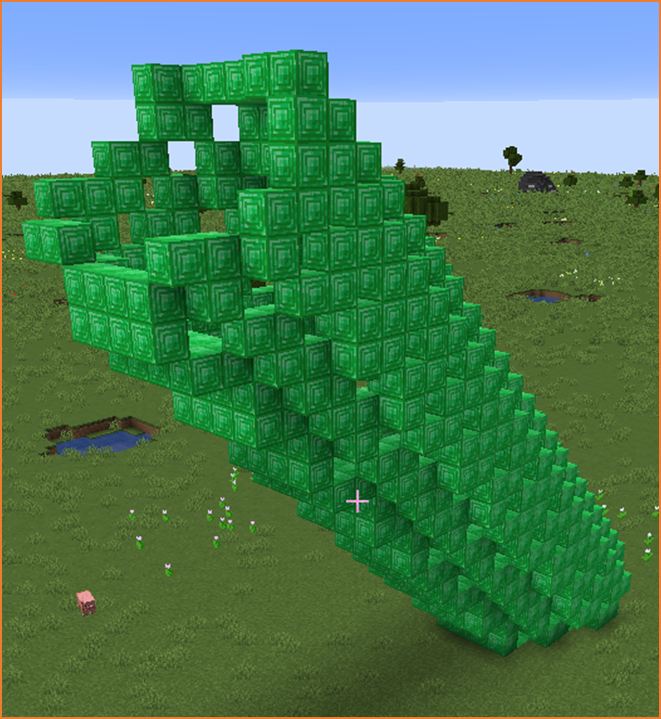
def tower():
  for count in range(30):
    vm.createCircle(4, False, Block.EMERALD_BLOCK)
    vm.moveTo(1, Direction.UP)
    vm.changeInclination(5)
In the next project we will create a beautiful rainbow using arcs and vertical rotation.
Rainbow Project
What We Will Build
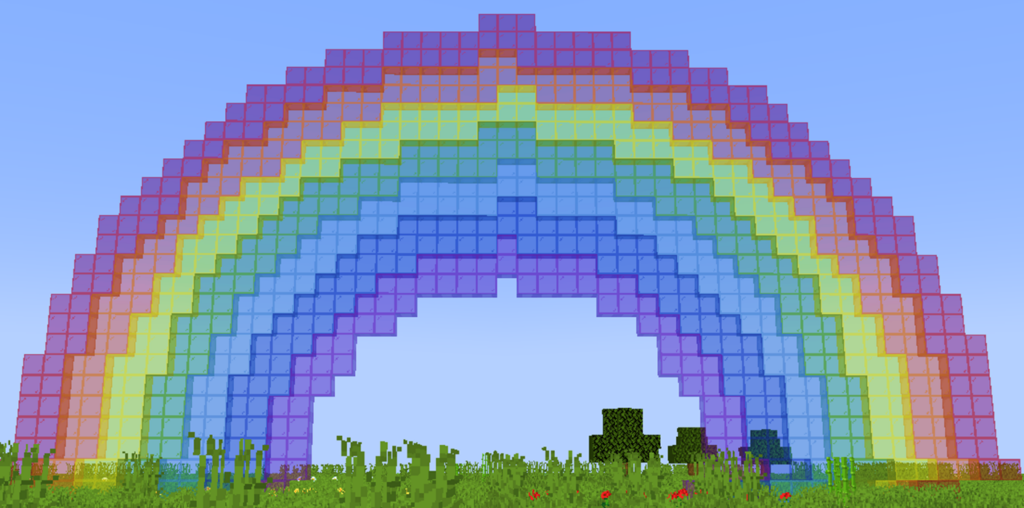
In this project we will build a beautiful rainbow that stretches across the sky in Minecraft.
A rainbow is made of several curved arcs that sit inside one another. Each arc has a different color, and together they form the classic rainbow shape we see after rain.
Instead of building each arc manually, our robot builder will generate the entire rainbow automatically using code.
The program will draw several arcs with different sizes and colors. Each arc will be slightly smaller than the previous one. When they are placed together, they create the rainbow pattern.
To make the arcs stand upright in the sky, we will change the inclination of the robot. This tells the robot to build vertically instead of horizontally.
This project introduces a new command that allows us to create curved shapes easily.
How the Program Works
The program creates the rainbow using several steps.
- Set the robot inclination so the arcs appear vertically.
- Create the largest arc using red glass.
- Create smaller arcs with different colors.
- Repeat this process until all rainbow colors are built.
- Create a final arc made of air to clean the inside of the rainbow.
Each arc is slightly smaller than the previous one. This is what creates the layered rainbow effect.
Understanding the Code Step by Step
Step 1 — Creating the Function
The program begins with a function definition.
def rainbow():This function contains all the instructions required to build the rainbow.
When we run the command in Minecraft:
/vm rainbowthe robot builder will execute the instructions inside the function.
Step 2 — Setting the Inclination
Before drawing the arcs, we need to make sure they are vertical.
vm.setInclination(90)This command tells the robot to tilt 90 degrees upward.
When the robot creates arcs now, they will stand upright instead of lying on the ground.
Step 3 — Creating the First Arc
The first arc is the largest one and forms the outside of the rainbow.
vm.createArc(24, 24, 180, True, Block.RED_STAINED_GLASS)The vm.createArc command creates a curved arc of blocks.
The parameters of the command are:
- 24 – the width of the arc
- 24 – the height of the arc
- 180 – the angle of the arc
- True – the arc is filled
- Block.RED_STAINED_GLASS – the material used
An arc angle of 180 degrees creates a half-circle shape.
This becomes the top layer of the rainbow.
Step 4 — Adding More Colored Arcs
After the red arc is created, the program continues building smaller arcs with different colors.
Each arc is slightly smaller than the previous one so they fit inside each other.
The next arcs use these colors:
- Orange stained glass
- Yellow stained glass
- Green stained glass
- Light blue stained glass
- Blue stained glass
- Purple stained glass
These colors match the natural colors of a rainbow.
Because each arc is smaller, the rainbow appears layered.
Step 5 — Cleaning the Inside
The final arc uses air blocks.
vm.createArc(10, 10, 180, True, Block.AIR)This removes blocks inside the rainbow and ensures the arc shape looks clean.
Understanding Important Commands
vm.setInclination
This command sets the vertical tilt of the robot.
In this program we set it to 90 degrees so the rainbow stands upright.
vm.createArc
This command creates curved shapes.
It is very useful for building arches, bridges, and rainbows.
Block Types
Minecraft has many different block types.
In this project we use stained glass blocks to give the rainbow bright colors.
Final Complete Code
#Python code: Create a rainbow
def rainbow():
  vm.setInclination(90)
  vm.createArc(24, 24, 180, True, Block.RED_STAINED_GLASS)
  vm.createArc(22, 22, 180, True, Block.ORANGE_STAINED_GLASS)
  vm.createArc(20, 20, 180, True, Block.YELLOW_STAINED_GLASS)
  vm.createArc(18, 18, 180, True, Block.GREEN_STAINED_GLASS)
  vm.createArc(16, 16, 180, True, Block.LIGHT_BLUE_STAINED_GLASS)
  vm.createArc(14, 14, 180, True, Block.BLUE_STAINED_GLASS)
  vm.createArc(12, 12, 180, True, Block.PURPLE_STAINED_GLASS)
  vm.createArc(10, 10, 180, True, Block.AIR)
Try It Yourself
Now it is your turn to experiment with the rainbow program.
- Change the colors of the arcs.
- Create a double rainbow.
- Make the rainbow bigger by increasing the arc sizes.
- Add clouds at the ends of the rainbow.
Programming lets you build large decorative structures very quickly. A rainbow that would take hundreds of blocks to place manually can be created in seconds using code.
In the next project we will learn how to create a sphere using circles and vertical rotation.
Ball Project
What We Will Build
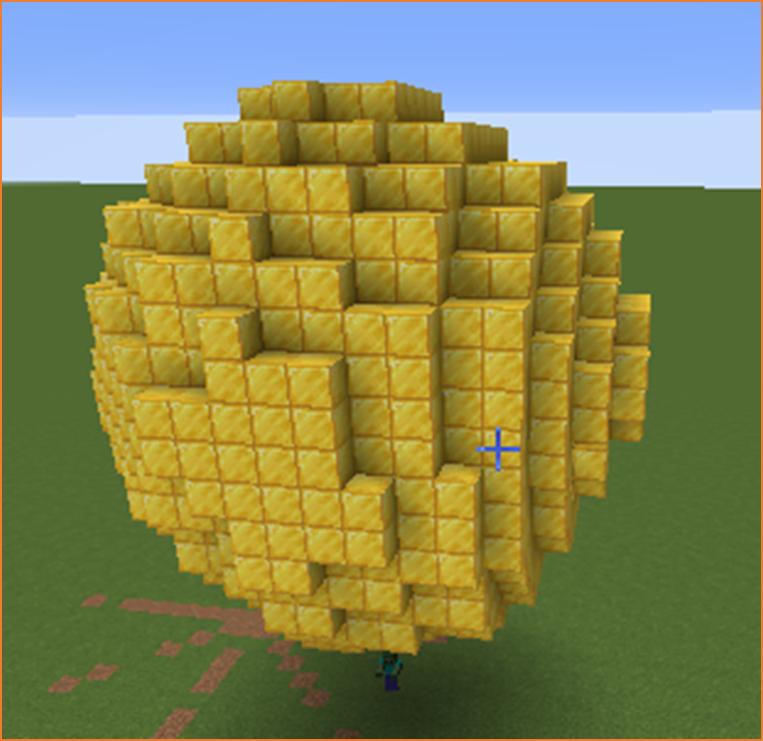
In this project we will build a large spherical ball made of gold blocks.
A sphere is one of the most interesting shapes in Minecraft programming. At first glance it may look difficult to create because it is curved in every direction.
If we tried to build a sphere manually block by block, it would take a very long time. We would need to carefully place thousands of blocks while constantly checking the shape.
Fortunately, programming allows us to create complex shapes much more easily.
Instead of placing individual blocks, we will create many circles and rotate them gradually. When the circles are placed at different vertical angles, they form a spherical object.
This technique is similar to stacking slices of an orange. Each slice is a circle, and when the slices are arranged together they form the full fruit.
In this project the robot builder will:
- Rotate slightly upward
- Create a circular ring of blocks
- Repeat this process many times
As the circles rotate around the vertical axis, they slowly form the shape of a ball.
How the Program Works
The ball is created using a loop that repeats several times.
Each time the loop runs, the robot performs two actions:
- Change its inclination slightly
- Create a circular ring of blocks
Because the robot tilts upward a little bit every time, the circles gradually move around the sphere.
After enough repetitions, the circles cover the entire surface of the ball.
The final structure appears as a round sphere made of gold blocks.
Understanding the Code Step by Step
Step 1 — Creating the Function
The program begins with a function definition.
def ball():This function contains all the instructions required to build the sphere.
When we run the command in Minecraft:
/vm ballthe robot builder will execute the instructions inside the function.
Step 2 — Creating the Loop
The sphere is created by repeating the same instructions many times.
for count in range(36):This loop repeats 36 times.
Each repetition creates one circular ring of the sphere.
Because the loop runs many times, the ball gradually becomes more complete.
Step 3 — Changing the Inclination
Inside the loop, the robot first changes its vertical tilt.
vm.changeInclination(5)This tilts the robot upward by 5 degrees.
Because this command runs inside the loop, the tilt increases gradually with each repetition.
This allows the circles to appear at different vertical angles.
Step 4 — Creating the Circle
After changing the inclination, the robot creates a circle of blocks.
vm.createCircle(8, False, Block.GOLD_BLOCK)The parameters of this command are:
- 8 – the radius of the circle
- False – the circle is not filled
- Block.GOLD_BLOCK – the material used
Each circle forms a ring around the sphere.
Because the inclination changes slightly before each circle, the rings appear at different angles.
When many rings are combined together, the result is a spherical shape.
Why 36 Repetitions?
The number of repetitions is carefully chosen.
Each repetition changes the inclination by 5 degrees.
If we multiply the number of repetitions by the inclination change, we get:
36 × 5 = 180 degrees
This means the circles cover the entire half of a sphere.
Because the circles wrap around the object, the shape becomes a complete sphere.
Understanding Important Commands
vm.changeInclination
This command gradually changes the vertical tilt of the robot.
When used inside a loop, it allows shapes to appear at different angles.
vm.createCircle
This command creates circular rings of blocks.
Circles are often used in combination with rotation to create spheres or curved structures.
Loops
Loops allow us to repeat instructions many times.
Without loops, creating a sphere would require writing dozens of separate commands.
Final Complete Code
#Python code: Create a spherical ball
def ball():
  for count in range(36):
    vm.changeInclination(5)
    vm.createCircle(8, False, Block.GOLD_BLOCK)
Try It Yourself
Now it is your turn to experiment with the ball program.
- Increase the radius of the circle to make a larger sphere.
- Use different block types such as diamond blocks.
- Try a smaller inclination change for smoother spheres.
- Create several spheres to build planets in the sky.
Programming allows us to build shapes that would normally take hours to construct manually. With just a few lines of code, we can create large and impressive structures.
In the next project we will combine this sphere technique with a tower to create a giant cherry.
Cherry Project
What We Will Build
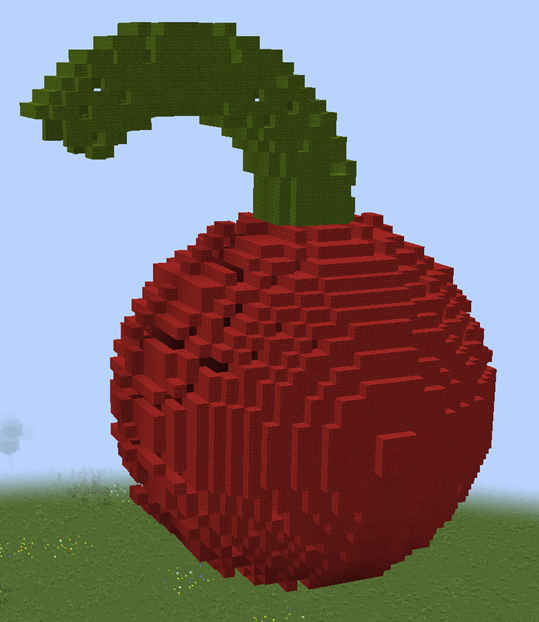
In this project we will create a giant cherry in Minecraft.
The cherry will have two main parts:
- A large red spherical fruit
- A curved green stem growing from the top
This project combines two techniques that you already learned in previous lessons.
- Creating a sphere using circles and vertical rotation
- Building a tower that gradually curves upward
By combining these ideas, we can create a realistic fruit shape in Minecraft.
Large decorative objects like this are often used in Minecraft builds such as:
- Garden decorations
- Fantasy structures
- Theme park attractions
- Giant food sculptures
Instead of placing thousands of blocks manually, our robot builder will generate the entire cherry automatically.
How the Program Works
The program works in several stages.
- Move the robot away from the player.
- Create the spherical fruit using circles and inclination.
- Reset the inclination.
- Move to the top of the fruit.
- Create the curved stem using repeated circles.
Each part of the cherry is built step by step using loops.
Because the inclination changes gradually during the loops, the shapes appear curved.
Understanding the Code Step by Step
Step 1 — Creating the Function
Every program begins with a function definition.
def cherry():This function contains the instructions that build the cherry.
When we run the command in Minecraft:
/vm cherrythe robot builder executes the instructions inside the function.
Step 2 — Moving the Robot
The first command moves the robot forward.
vm.moveTo(20, Direction.FORWARD)This prevents the structure from appearing directly on top of the player.
The cherry will appear 20 blocks away from where the player is standing.
Step 3 — Creating the Cherry Sphere
Next the program begins creating the spherical fruit.
for count in range(36):This loop repeats 36 times.
Inside the loop, the robot performs two actions:
- Change the inclination
- Create a circle
The inclination change is:
vm.changeInclination(5)This tilts the robot slightly upward each time the loop runs.
Then the robot creates a large red circle.
vm.createCircle(16, False, Block.RED_WOOL)The parameters of this command are:
- 16 – the radius of the circle
- False – the circle is hollow
- Block.RED_WOOL – the material used
Because the inclination changes before each circle, the rings gradually rotate and form a sphere.
This creates the round fruit of the cherry.
Step 4 — Resetting the Inclination
After the sphere is finished, the robot resets its inclination.
vm.setInclination(0)This ensures the next structure is built vertically instead of continuing the curved rotation.
Step 5 — Moving to the Top of the Cherry
Next the robot moves upward to reach the top of the sphere.
vm.moveTo(16, Direction.UP)This places the robot at the location where the stem should begin.
Step 6 — Creating the Stem
The stem is created using another loop.
for count2 in range(30):This loop repeats 30 times.
Inside the loop the robot performs three actions:
- Create a circle
- Move upward
- Change the inclination
First the robot creates a small green circle.
vm.createCircle(4, False, Block.GREEN_WOOL)This creates a ring that forms part of the stem.
Next the robot moves upward.
vm.moveTo(1, Direction.UP)This allows the stem to grow vertically.
Finally the inclination changes again.
vm.changeInclination(5)Because the inclination changes gradually, the stem bends as it grows.
This gives the cherry a realistic curved stem.
Understanding Important Commands
vm.changeInclination
This command tilts the robot gradually.
When used inside loops it creates curved structures.
vm.setInclination
This command sets the robot’s tilt to a specific angle.
We use it to reset the robot before building the stem.
vm.createCircle
This command creates circular rings of blocks.
When circles are combined with rotation they can form spheres or curved towers.
Loops
Loops allow the robot to repeat instructions many times.
This makes it possible to build large structures with very little code.
Final Complete Code
#Python code: Create a huge cherry
def cherry():
  vm.moveTo(20, Direction.FORWARD)
  for count in range(36):
    vm.changeInclination(5)
    vm.createCircle(16, False, Block.RED_WOOL)
  vm.setInclination(0)
  vm.moveTo(16, Direction.UP)
  for count2 in range(30):
    vm.createCircle(4, False, Block.GREEN_WOOL)
    vm.moveTo(1, Direction.UP)
    vm.changeInclination(5)
Try It Yourself
Now experiment with the cherry program.
- Create two cherries next to each other.
- Use different colors to make other fruits.
- Increase the radius to create a giant cherry.
- Add leaves at the top of the stem.
By combining simple shapes with rotation, you can build complex organic structures.
In the next section we will learn how to organize our code using functions so that large programs become easier to read and modify.