In previous sections you learned that loops allow programs to repeat instructions automatically.
Loops are one of the most important tools in programming because they allow a small program to create very large structures.
In this section we will explore a special type of loop called a counting loop.
A counting loop repeats instructions a specific number of times while keeping track of the current step using a number.
This number can be used inside the program to change how the structure is built during each repetition.
For example, the program might:
- Create smaller shapes each time
- Create larger shapes each time
- Change colors during each step
- Move to different positions
This makes counting loops extremely useful for building structures that gradually change shape.
In Minecraft programming, counting loops are often used to create structures such as pyramids, spirals, and decorative patterns.
Concepts You Will Learn
- What counting loops are
- How loops count each repetition
- How the loop counter can control shapes
- How counting loops create structures that grow or shrink
How Counting Loops Work
A common counting loop in Python looks like this:
for count in range(5):This loop repeats five times.
Each time the loop repeats, the variable count increases.
During the repetitions the value of count will be:
- 0
- 1
- 2
- 3
- 4
Because the number changes during each repetition, we can use it to modify the structure being built.
For example, a program might increase the size of a square during each step.
This allows the robot builder to create shapes that grow larger and larger.
Or the program might decrease the size during each step, creating shapes that become smaller.
Understanding the Parameters of the range() Function
In many of the programs in this course we use the Python function range() inside loops.
The range() function tells the loop how many times it should repeat.
But range() can actually accept up to three parameters.
These parameters allow us to control how the counting works.
The three parameters are:
- Start value
- Stop value
- Step value
1. Start Value
The start value defines the number where the counting begins.
For example:
for count in range(2, 6):In this loop the counting begins at 2.
The values of count during the loop will be:
- 2
- 3
- 4
- 5
If the start value is not provided, Python automatically starts counting from 0.
For example:
for count in range(5):This produces the values:
- 0
- 1
- 2
- 3
- 4
2. Stop Value
The stop value defines where the counting ends.
The loop will stop before reaching this number.
For example:
for count in range(1, 5):The values of count will be:
- 1
- 2
- 3
- 4
The number 5 is not included because the stop value is not reached.
3. Step Value
The step value controls how much the counter increases each time.
For example:
for count in range(0, 10, 2):The step value is 2, so the loop increases by two each time.
The values of count will be:
- 0
- 2
- 4
- 6
- 8
This type of loop is useful when building structures that grow in larger steps.
Example in Minecraft Programming
For example, we could create shapes that increase in size during each step:
for size in range(2, 12, 2):
  vm.createSquare(size, False, Block.BLUE_WOOL)
This loop creates squares of size:
- 2
- 4
- 6
- 8
- 10
Using the three parameters of range() allows us to control how loops behave and how structures change during a program.
Projects in This Section
In this section you will create three projects that demonstrate how counting loops can control structures.
- Pyramid
- Fun Carpet
- Hourglass
Each project will use loops in a different way to create interesting shapes.
By the end of this section you will understand how counting loops can control the size and position of structures in Minecraft.
In the next project we will build a pyramid using a counting loop.
Pyramid Project
What We Will Build
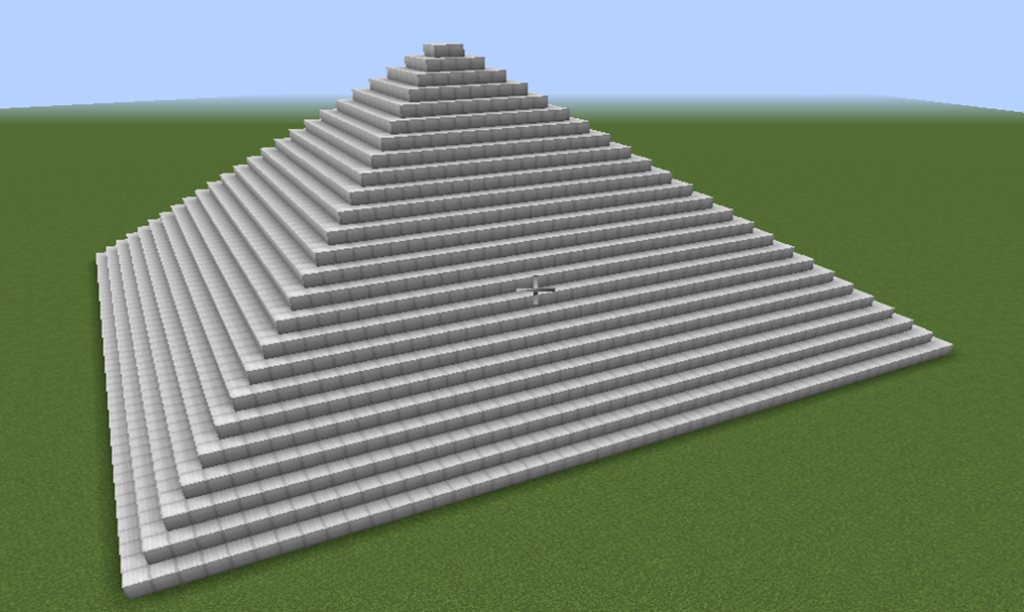
In this project we will build a pyramid made of stacked square layers.
A pyramid is a structure that becomes smaller as it rises upward.
The bottom layer is the largest, and each layer above it becomes smaller.
This type of structure is perfect for learning how counting loops can change the size of shapes during each repetition.
Instead of writing a separate instruction for every layer, we will use a loop to automatically create each level of the pyramid.
The program will gradually decrease the size of the square during each loop repetition.
The robot builder will then stack the layers on top of each other.
How the Program Works
The pyramid is created using a counting loop.
Each repetition of the loop builds one layer of the pyramid.
During each step:
- A square layer is created.
- The robot moves upward.
- The size of the square becomes smaller.
Because the squares become smaller each time, the structure forms a pyramid shape.
Understanding the Code Step by Step
Step 1 — Creating the Function
The program begins by defining a function.
def pyramid():This function contains the instructions for building the pyramid.
When we run the command in Minecraft:
/vm pyramidthe robot builder executes the instructions inside the function.
Step 2 — Creating the Variable
Next we create a variable that controls the size of the square.
width = 50This means the first layer of the pyramid will have a square size of 14 blocks.
During the program this value will change.
Step 3 — Creating the Counting Loop
Now we create the counting loop.
for count in range(25):This loop repeats 25 times.
Each repetition builds one layer of the pyramid.
Step 4 — Creating a Layer
Inside the loop the robot creates a square layer.
vm.createSquare(size, True, Block.IRON_BLOCK)The parameters mean:
- width— the size of the layer
- True — the square is filled
- Block.IRON_BLOCK— the building material
Step 5 — Moving Upward
After creating the layer, the robot moves upward.
vm.moveTo(1, Direction.UP)This prepares the robot to build the next layer above the previous one.
Step 6 — Changing the Size
Now the program reduces the size of the square.
width = width - 2This makes the next layer two blocks smaller on each side.
Because the size decreases during each repetition, the structure becomes narrower as it rises.
Python Code
#Python code: Create a pyramid
def pyramid():
  width = 50
  for count in range(25):
    vm.createSquare(2, False, Block.IRON_BLOCK)
    vm.moveTo(1, Direction.UP)
    width = width - 2
Understanding the Python Syntax
Variables
The variable width stores the current size of the pyramid layer.
Each time the loop repeats, the value changes.
Counting Loops
The loop repeats a fixed number of times.
Each repetition builds another level of the pyramid.
Updating Variables
The instruction width = width - 2 changes the value stored in the variable.
This allows the structure to gradually change shape.
Try It Yourself
Experiment with the pyramid program.
- Create a taller pyramid.
- Change the starting size.
- Use different block materials.
- Add decorations on top.
Counting loops allow structures to grow or shrink during each step of the program.
In the next project we will use counting loops to create a colorful decorative carpet pattern.
Fun Carpet Project
What We Will Build
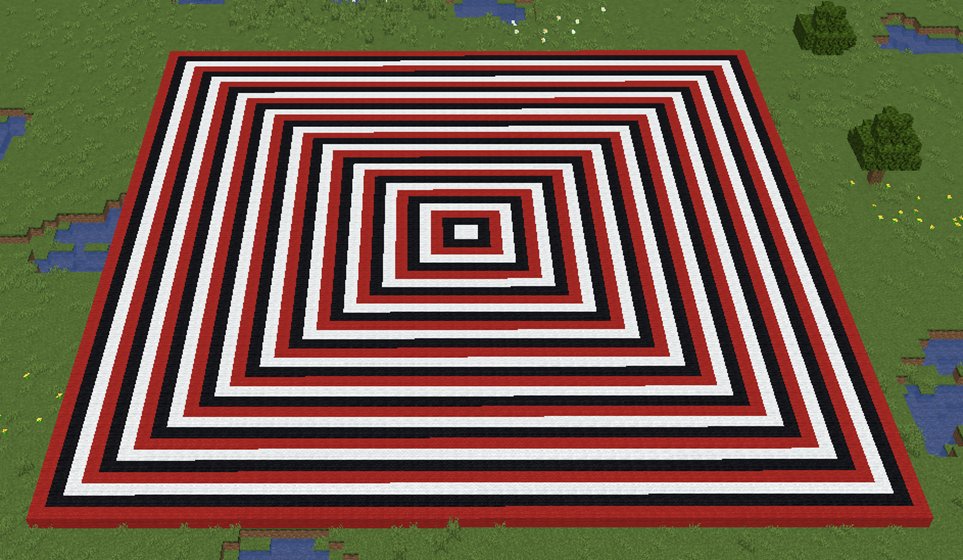
In this project we will build a colorful decorative carpet pattern.
Carpet patterns are often used to decorate floors in castles, houses, and large halls.
Instead of placing every square manually, the robot builder will automatically create expanding squares of different colors.
The result will look like a decorative carpet made of several layers.
Each layer of the carpet will be larger than the previous one.
This project shows how counting loops can gradually change the size of shapes.
How the Program Works
The program uses a counting loop that repeats several times.
Each repetition performs three steps:
- Create a square.
- Increase the size of the square.
- Move the robot slightly to keep the pattern centered.
Because the square becomes larger each time, the pattern grows outward like a carpet spreading across the floor.
Different block colors can also be used to make the design more decorative.
Understanding the Code Step by Step
Step 1 — Creating the Function
The program begins by defining a function.
def carpet():This function contains the instructions that create the carpet pattern.
When we run the command in Minecraft:
/vm carpetthe robot builder executes the instructions inside the function.
Step 2 — Creating the Variable
Next we create a variable that controls the size of the square.
i = 2This means the first square will be very small.
During the loop the value of i will increase.
Step 3 — Creating the Counting Loop
Now we create the loop.
for i in range(2, 61, 6):The variable i starts by a value of 2. and continues addin 6 until is less or equals 61. In our case 2, 8, 14, 20, …
Each repetition creates another layer of the carpet.
Step 4 — Creating the Square
Inside the loop the robot creates a filled square.
vm.createSquare(i, False, Block.RED_WOOL)The parameters mean:
- i — the size of the square
- False — the square is empty
- Block.RED_WOOL — the material used
This square forms one layer of the carpet.
Step 5 — Increasing the Size
After creating the square, the program increases the value of the size variable.
size = size + 6This means the next square will be larger.
Because this happens during each repetition, the carpet grows outward.
Python Code
#Python code: Create a decorative carpet
def carpet():
for i in range(2, 61, 6):
    vm.createSquare(i, False, Block.WHITE_WOOL)
  for i in range(4, 61, 6):
    vm.createSquare(i, False, Block.BLACK_WOOL)
  for i in range(6, 61, 6):
    vm.createSquare(i, False, Block.RED_WOOL)
Understanding the Python Syntax
Variables
The variable size controls the size of each square layer.
The value increases during the program.
Counting Loops
The loop repeats the instructions several times, creating multiple layers of the carpet.
Updating Variables
The instruction i = i + 6 increases the value stored in the variable.
This allows the shape to grow during each repetition.
Try It Yourself
Experiment with the carpet program.
- Use different block colors.
- Create larger carpet patterns.
- Add decorative borders.
- Create carpets for castle floors.
Counting loops are very useful for building expanding patterns and decorative structures.
In the next project we will build an hourglass shape using counting loops.
Hourglass Project

What We Will Build
In this project we will build an hourglass-shaped structure.
An hourglass is a classic object used to measure time using sand. It has a wide top, a narrow middle, and a wide bottom.
This shape is interesting for programming because it gradually becomes smaller and then larger again.
Using Python loops, the robot builder can automatically create this changing shape layer by layer.
Instead of manually building every circle, the program will control the size of the circles using a counting loop.
Each loop repetition changes the size of the circle and moves the robot upward.
By repeating this process, the circles stack together to form the hourglass shape.
How the Program Works
The program builds the hourglass in two stages:
- The first loop creates circles that become smaller.
- The second loop creates circles that become larger again.
Because the circles shrink and then expand, the structure forms the narrow center of the hourglass.
Understanding the Code Step by Step
Step 1 — Creating the Function
The program begins with a function definition.
def hourglass():This function contains all the instructions needed to build the structure.
When the function runs, the robot builder executes each instruction inside it.
Step 2 — The First Counting Loop
The first loop creates the top half of the hourglass.
for i in range(15, 1, -1):This version of range() uses three parameters:
- 15 — the starting size
- 1 — the stopping value
- -1 — the step value (the size decreases each step)
Because the step value is negative, the loop counts downward.
The circles gradually become smaller as the program runs.
Step 3 — Creating the Circles
Inside the loop the robot creates a circle.
vm.createCircle(i, False, Block.GOLD_BLOCK)The parameters mean:
- i — the radius of the circle
- False — the circle is hollow
- Block.GOLD_BLOCK — the material used
Because the value of i changes during each repetition, the circle size gradually decreases.
Step 4 — Moving Upward
After creating each circle, the robot moves upward.
vm.moveTo(0.5, Direction.UP)This movement stacks the circles vertically.
The value 0.5 creates very thin layers, making the hourglass smoother.
Step 5 — The Second Counting Loop
After reaching the narrow center, the program begins expanding the shape again.
for i in range(2, 16):This loop counts upward from 2 to 15.
Each repetition creates a larger circle than the previous one.
This forms the bottom half of the hourglass.
Python Code
#Python code: Create an hourglass
def hourglass():
for i in range(15, 1, -1):
    vm.createCircle(i, False, Block.GOLD_BLOCK)
    vm.moveTo(0.5, Direction.UP)
  for i in range(2, 16):
    vm.createCircle(i, False, Block.GOLD_BLOCK)
    vm.moveTo(0.5, Direction.UP)
Understanding the Python Syntax
Counting Loops
The loops control how the size of the circles changes during the program.
The first loop decreases the size, and the second loop increases it.
The range() Function
The three parameters of range() control the starting value, stopping value, and step size.
Using a negative step value allows the loop to count downward.
vm.createCircle
This command creates circular rings of blocks.
Stacking circles vertically is a powerful technique for creating curved structures.
Try It Yourself
Try modifying the hourglass program.
- Create a larger hourglass.
- Use different block materials.
- Add sand blocks inside the center.
- Create several hourglasses in a row.
By adjusting the loop parameters you can create many different shapes using the same basic idea.