Advanced Structures
So far in this course you have learned how to create shapes, patterns, and environments using Python programs.
You have used loops to repeat instructions, lists to store information, and drawing patterns to create detailed designs.
In this section we will combine several of these techniques to build much more complex Minecraft structures.
These projects will demonstrate how programs can control building in three dimensions.
Instead of creating flat drawings or simple shapes, the robot builder will construct complete structures such as buildings and monuments.
Concepts You Will Learn
- How lists can store complex building patterns
- How rotation can change the direction of drawing
- How vertical rotation creates 3D shapes
- How programs combine multiple techniques to create large structures
Combining Lists and 3D Rotations
In earlier projects you used lists to store drawing patterns and materials.
Lists allow programs to describe shapes using numbers and symbols.
In this section we will take this idea further.
Instead of creating flat drawings, we will rotate shapes in different directions to build three-dimensional structures.
The robot builder can rotate horizontally and vertically while drawing shapes.
This makes it possible to create curved surfaces, domes, towers, and many other complex designs.
By combining lists with rotation commands, programs can generate structures that would be very difficult to build by hand.
Projects in This Section
In this section you will build three advanced Minecraft structures.
House
In this project you will create a small house structure.
The house will include walls, a roof, and interior space.
The program will combine several shapes to create a complete building.
Colosseum
In this project you will build a large circular arena inspired by the famous Roman Colosseum.
The program will use rotation and repeated shapes to create a large curved structure.
This project demonstrates how loops and rotation can generate massive buildings automatically.
Mushroom House
In this project you will build a fantasy-style mushroom house.
The mushroom cap will be created using circular layers that gradually change size.
This demonstrates how programs can create curved organic shapes.
Lightbulb
The final project of the course is a glowing lightbulb structure.
This build uses rotation, circles, and vertical stacking to create a complex three-dimensional shape.
It combines many of the techniques learned throughout the course.
By the end of this section you will be able to create advanced Minecraft structures using Python programs.
In the next project we will begin by building a simple house structure.
House Project
What We Will Build
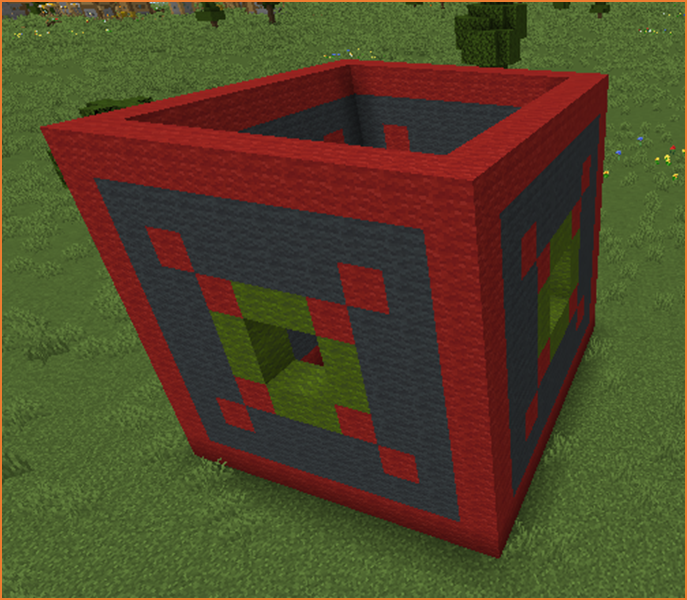
In this project we will build a small house using Python code.
Instead of creating the entire structure at once, the program will build the house one wall at a time.
Each wall will be drawn using a pixel-art pattern stored in a list.
The robot builder will then rotate and repeat the wall four times to form the four sides of the house.
This project demonstrates how lists and rotation can work together to create a three-dimensional structure.
How the Program Works
The program contains two functions:
- cube() – controls the construction of the house
- wall() – draws one wall of the house
The main function builds the house by calling the wall function four times.
After each wall is created, the robot rotates so the next wall appears on a different side.
Repeating this process creates a cube-shaped structure.
Understanding the Code Step by Step
Step 1 — Moving to the Building Location
The program begins by moving the robot builder forward.
vm.moveTo(15, Direction.FORWARD)This moves the robot away from the player so the house does not overlap with the current position.
Step 2 — Creating the Loop
Next the program creates a loop.
for count in range(4):This loop repeats four times.
Each repetition creates one wall of the house.
Since a house has four sides, the loop runs four times.
Step 3 — Drawing the Wall
Inside the loop the program calls the wall() function.
wall()This function contains the instructions for drawing one wall.
Using a function allows the same wall design to be reused multiple times.
Step 4 — Moving to the Next Corner
After drawing the wall, the robot moves sideways.
vm.moveTo(9, Direction.RIGHT)This positions the robot at the corner where the next wall should begin.
Step 5 — Rotating the Robot
Next the robot rotates 90 degrees.
vm.changeDirection(90)This changes the drawing direction so the next wall is built at a right angle to the previous one.
Repeating this process four times creates the four sides of the house.
Step 6 — Creating the Wall Pattern
The wall() function draws a wall using a pixel-art pattern.
First the robot rotates vertically so the drawing appears upright.
vm.setInclination(90)Next the program uses the vm.createDrawing command.
The first list defines the pattern of the wall.
Each string represents one row of blocks.
Each number corresponds to a material defined in the second list.
This allows the program to create windows, decorations, and walls automatically.
After the drawing is complete, the robot returns to its normal orientation.
vm.setInclination(0)Python Code
def cube():
  vm.moveTo(15, Direction.FORWARD)
  for count in range(4):
    wall()
    vm.moveTo(9, Direction.RIGHT)
    vm.changeDirection(90)

def wall():
 vm.setInclination(90)
  vm.createDrawing(
  ["1111111111",
   "1000000001",
   "1010000101",
   "1001221001",
   "1002332001",
   "1002332001",
   "1001221001",
   "1010000101",
   "1000000001",
   "1111111111"
  ], [
    [dict(TYPE=Block.GRAY_WOOL)],
    [dict(TYPE=Block.RED_WOOL)],
    [dict(TYPE=Block.GREEN_WOOL)],
    [dict(TYPE=Block.AIR)],
    [Block.NOTHING],
    [Block.NOTHING],
    [Block.NOTHING],
    [Block.NOTHING],
    [Block.NOTHING],
    [Block.NOTHING]
  ], 1, Draw.CENTER)
  vm.setInclination(0)
Understanding the Python Syntax
Functions
Functions allow programs to organize instructions into reusable sections.
The wall() function is used multiple times to build the house.
Loops
The loop repeats the wall construction four times to create the four sides of the building.
Lists
Lists are used to store the pixel-art pattern and the materials used to build the wall.
Rotation
The robot changes direction after each wall so that the structure forms a cube shape.
Try It Yourself
Try modifying the house program.
- Create larger houses.
- Design different wall patterns.
- Add doors and windows.
- Create villages using several houses.
By combining lists, loops, and rotation, programs can create complete buildings automatically.
Colosseum Project
What We Will Build
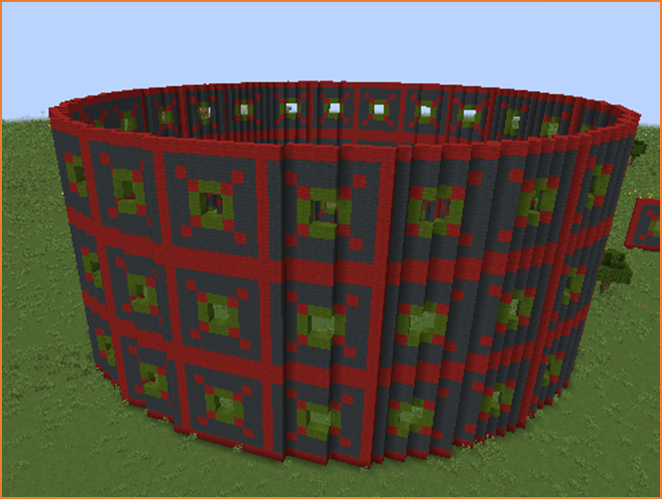
In this project we will build a large circular arena inspired by the famous Roman Colosseum.
The Colosseum was an enormous amphitheater where spectators watched games and competitions.
Our Minecraft version will be built by repeating the same wall pattern many times while rotating the robot builder slightly each time.
This technique allows the program to create a circular structure.
The project also demonstrates an important programming idea: reusing functions.
Instead of writing new code for every wall of the Colosseum, we will reuse the same wall() function that we created in the previous project.
Reusing functions makes programs shorter, easier to read, and easier to modify.
How the Program Works
The program builds the Colosseum in several steps.
- The robot moves to a location where the arena will be built.
- The program builds a circular ring of walls.
- The robot moves upward to create another level.
- The process repeats to create multiple floors.
The circular shape is created by slightly rotating the robot after each wall segment.
By repeating this many times, the structure forms a complete ring.
Understanding the Code Step by Step
Step 1 — Moving to the Building Location
The program begins by moving the robot away from the player.
vm.moveTo(15, Direction.FORWARD)This ensures the Colosseum is built in an open space.
Step 2 — Creating the Levels
Next the program creates a loop that controls how many floors the arena will have.
for count2 in range(3):This loop repeats three times.
Each repetition creates one level of the Colosseum.
Step 3 — Building the Circular Wall
Inside the first loop there is another loop.
for count in range(24):This loop repeats twenty-four times.
Each repetition creates one wall section.
Together these wall sections form a circular ring.
Step 4 — Reusing the Wall Function
Instead of writing the wall drawing instructions again, the program calls the wall() function.
wall()This is the same function used in the house project.
Reusing functions is an important programming technique.
It allows us to reuse the same code in multiple projects.
In this case, the same decorative wall pattern is used for every section of the Colosseum.
Step 5 — Moving to the Next Position
After creating a wall segment, the robot moves sideways.
vm.moveTo(9, Direction.RIGHT)This positions the robot for the next wall section.
Step 6 — Rotating to Create the Circle
Next the robot rotates slightly.
vm.changeDirection(15)This rotates the robot by 15 degrees.
After repeating this step 24 times, the walls form a full circle.
Step 7 — Moving Upward for the Next Level
After finishing one ring of walls, the robot moves upward.
vm.moveTo(10, Direction.UP)This allows the next level of the Colosseum to be built above the previous one.
Repeating the outer loop three times creates a multi-level arena.
Python Code
def cube():
  vm.moveTo(15, Direction.FORWARD)
  for count2 in range(3):
    for count in range(24):
      wall()
      vm.moveTo(9, Direction.RIGHT)
      vm.changeDirection(15)
    vm.moveTo(10, Direction.UP)

def wall():
  vm.setInclination(90)
  vm.createDrawing(
  ["1111111111",
   "1000000001",
   "1010000101",
   "1001221001",
   "1002332001",
   "1002332001",
   "1001221001",
   "1010000101",
   "1000000001",
   "1111111111"
  ], [
    [dict(TYPE=Block.GRAY_WOOL)],
    [dict(TYPE=Block.RED_WOOL)],
    [dict(TYPE=Block.GREEN_WOOL)],
    [dict(TYPE=Block.AIR)],
    [Block.NOTHING],
    [Block.NOTHING],
    [Block.NOTHING],
    [Block.NOTHING],
    [Block.NOTHING],
    [Block.NOTHING]
  ], 1, Draw.CENTER)
  vm.setInclination(0)
Understanding the Python Syntax
Nested Loops
The program uses loops inside other loops.
The outer loop controls the number of floors, while the inner loop creates the circular ring of walls.
Functions
The wall() function is reused many times.
This avoids repeating the same code.
Rotation
The command vm.changeDirection(15) rotates the robot slightly after each wall section.
This allows the walls to form a circular structure.
Try It Yourself
Try modifying the Colosseum program.
- Create more levels.
- Change the wall design.
- Build larger arenas.
- Create stadiums or amphitheaters.
By combining loops, functions, and rotation, programs can create very large architectural structures automatically.
Mushroom House Project
What We Will Build
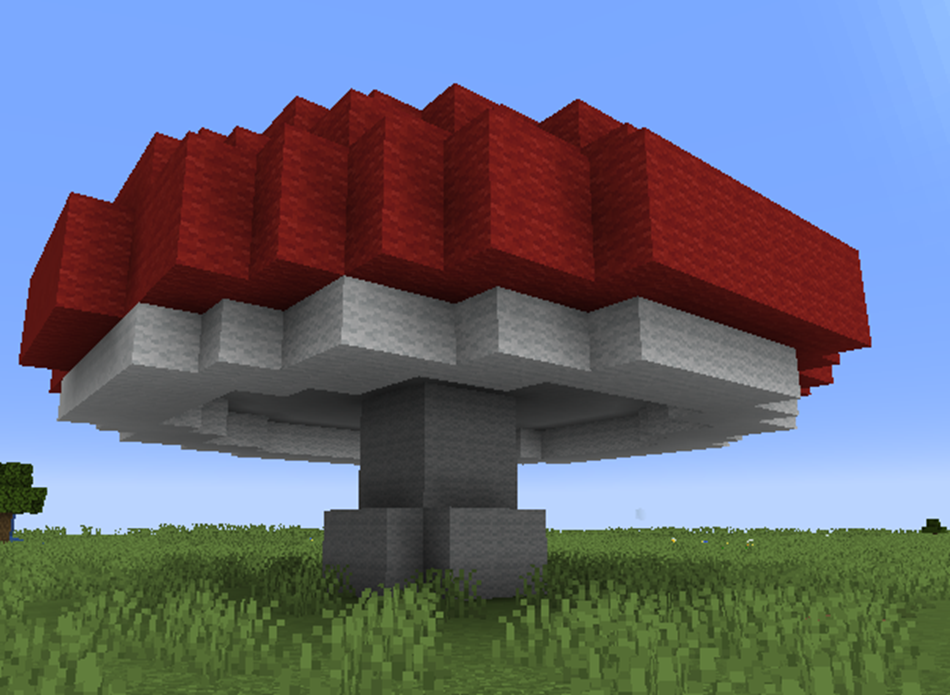
In this project we will build a fantasy-style mushroom house.
Mushroom houses are common in fantasy worlds and games. They usually have a round roof and a small living space inside the stem.
This project demonstrates how a two-dimensional drawing can be rotated to create a three-dimensional structure.
The robot builder will repeatedly draw a vertical slice of the mushroom while slowly rotating around a circle.
When all the slices are combined, the shape becomes a complete mushroom house.
How the Program Works
The program builds the mushroom in two main parts:
- A function called slice() draws one vertical slice of the mushroom.
- The main function rotates the robot and repeats this slice many times.
By rotating slightly after each slice, the program forms a round three-dimensional structure.
Understanding the Code Step by Step
Step 1 — Moving to the Building Area
The program begins by moving the robot forward.
vm.moveTo(12, Direction.FORWARD)This moves the robot away from the player so the mushroom house is built in an open area.
Step 2 — Creating the Rotation Loop
Next the program creates a loop.
for count in range(90):This loop repeats ninety times.
Each repetition creates one slice of the mushroom structure.
Step 3 — Drawing a Slice
Inside the loop the program calls the slice() function.
slice()This function draws a vertical cross-section of the mushroom.
The slice contains the stem and part of the mushroom cap.
Step 4 — Rotating the Robot
After drawing each slice, the robot rotates slightly.
vm.changeDirection(4)The robot turns 4 degrees before drawing the next slice.
Repeating this process ninety times completes a full circle.
The slices combine to form the round mushroom shape.
Step 5 — The Slice Drawing
The slice() function uses the vm.createDrawing command.
The first list contains the drawing pattern.
Each string represents a row in the slice.
The numbers inside the strings represent different materials.
The second list defines which blocks correspond to those numbers.
For example:
- Red wool creates the mushroom cap
- White wool creates decorative spots
The robot builder reads the pattern and builds the slice automatically.
Python Code
#Python code: Create a mushroom shaped house
def house():
  vm.moveTo(12, Direction.FORWARD)
  for count in range(90):
    slice()
    vm.changeDirection(4)

def slice():
  vm.createDrawing(
  ["0111110000","0000001100","0000000010","0000000001","0022222011",
   "0200000220","0200000000","0200000000","0020000000","0020000000"
  ], [
    [Block.NOTHING],
    [dict(TYPE=Block.RED_WOOL)],
    [dict(TYPE=Block.WHITE_WOOL)],
    [Block.NOTHING],
    [Block.NOTHING],
    [Block.NOTHING],
    [Block.NOTHING],
    [Block.NOTHING],
    [Block.NOTHING],
    [Block.NOTHING]
  ], 1, Draw.CENTER)
Understanding the Python Syntax
Functions
The program uses two functions.
The house() function controls the rotation and repetition of slices.
The slice() function defines the shape of one slice of the mushroom.
Rotation
The command vm.changeDirection(4) rotates the robot slightly after each slice.
Repeating this rotation creates a circular structure.
Lists
Lists store the drawing pattern and the materials used in the slice.
This allows the program to generate complex shapes from simple data.
Try It Yourself
Try modifying the mushroom house program.
- Create larger mushrooms.
- Use different colors for the cap.
- Add windows or doors.
- Create a village of mushroom houses.
By combining lists, drawing patterns, and rotation, programs can create detailed organic shapes that would be very difficult to build manually.
Lightbulb Project

What We Will Build
In this final project we will build a giant glowing lightbulb.
The lightbulb combines many of the techniques you have learned during this course:
- Lists for drawing patterns
- Functions to organize code
- Loops to repeat structures
- Rotation to create curved 3D shapes
The robot builder will repeatedly draw a vertical slice of the lightbulb while rotating around a circle.
When all slices are combined, they form a round glass bulb with a glowing center.
How the Program Works
The program is organized into two functions:
- lightbulb() controls the rotation and repetition of slices
- light() draws one slice of the bulb
By repeating the slice many times and rotating slightly after each slice, the robot builder creates a smooth round shape.
Understanding the Code Step by Step
Step 1 — Moving to the Building Area
The program begins by moving the robot away from the player.
vm.moveTo(10, Direction.FORWARD)This ensures the structure is built in an open area.
Step 2 — Rotating the Drawing Direction
Next the program changes the inclination of the robot.
vm.setInclination(90)This rotates the robot so that the drawing will be vertical.
This is necessary when creating slices of a three-dimensional object.
Step 3 — Creating the Rotation Loop
The program then creates a loop.
for count in range(90):This loop repeats ninety times.
Each repetition creates one slice of the lightbulb.
Step 4 — Drawing the Slice
Inside the loop the program calls the light() function.
light()This function draws a vertical slice of the lightbulb.
The slice includes the glass exterior, the glowing interior, and the base of the bulb.
Step 5 — Rotating the Robot
After drawing each slice, the robot rotates slightly.
vm.changeDirection(4)This rotates the robot 4 degrees before the next slice is drawn.
After ninety slices, the structure forms a full circular shape.
Step 6 — The Slice Drawing
The light() function creates the slice using the vm.createDrawing command.
The first list defines the shape of the slice.
Each string represents a row of the drawing.
The numbers inside the pattern correspond to materials defined in the second list.
For example:
- Cyan stained glass forms the transparent glass bulb
- Copper blocks create the base of the lightbulb
- Sea lantern blocks create the glowing center
By combining these materials, the program creates a realistic lightbulb structure.
Python Code
def lightbulb():
  vm.moveTo(10, Direction.FORWARD)
  vm.setInclination(90)
  for count in range(90):
    light()
    vm.changeDirection(4)

def light():
  vm.createDrawing(
  ["111100", "000010", "000010", "000001", "000001","030001",
   "030010", "300010", "300100", "302000", "020000", "002000", "020000"
  ], [
    [Block.NOTHING],
    [dict(TYPE=Block.CYAN_STAINED_GLASS)],
    [dict(TYPE=Block.COPPER_BLOCK)],
    [dict(TYPE=Block.SEA_LANTERN)],
    [Block.NOTHING],
    [Block.NOTHING],
    [Block.NOTHING],
    [Block.NOTHING],
    [Block.NOTHING],
    [Block.NOTHING]
  ], 1, Draw.CENTER)
Understanding the Python Syntax
Functions
The program uses two functions.
The lightbulb() function controls the building process, while the light() function defines the shape of one slice.
Lists
Lists store the drawing pattern and the materials used to build the slice.
This allows the program to represent shapes using simple numbers.
Loops
The loop repeats the slice drawing ninety times.
Repeating the slice while rotating creates the full bulb shape.
3D Rotation
The command vm.changeDirection(4) rotates the robot slightly after each slice.
This rotation is what transforms a flat drawing into a three-dimensional structure.
Try It Yourself
Try modifying the lightbulb program.
- Create larger bulbs.
- Change the glass color.
- Use different glowing blocks.
- Create decorative lighting structures.
Congratulations! By completing this project you have used many of the most powerful techniques in Python-based Minecraft building.
You can now combine loops, lists, functions, and rotation to create complex three-dimensional structures automatically.