Minecraft + Visualmodder: From Nothing to First Command
This tutorial shows how to install a Minecraft Spigot server from scratch and extend it with the Visualmodder plugin. Spigot is a lightweight, highly compatible Minecraft server implementation that allows plugins and customization.
Introduction: How Minecraft Servers Work
Minecraft is built on a client–server architecture. The server is the program that runs the game world — it handles players, blocks, entities, and game logic. The client (the Minecraft game you launch) connects to that server to interact with the world.
In other words: the world does not live inside your game — it lives on the server. Your client is simply a viewer and controller that sends and receives data.
There are different types of Minecraft server software:
- Vanilla Server – The official server provided by Mojang. It is stable but does not support plugins or customization.
- Spigot Server – A modified server that improves performance and adds a plugin system. This is the most widely used base for custom servers.
- Paper Server – A further optimized version of Spigot with additional features and performance improvements. However, some plugins are not fully compatible with Paper.
- ⚠️ Important: Although Paper servers are popular, they may cause compatibility issues with Visualmodder. For this tutorial, we use a pure Spigot server.
Plugins are extensions that run inside the server. They can:
- Add new commands
- Modify gameplay
- Automate tasks
- Create entirely new mechanics
The Visualmodder plugin is one such extension. It allows you to program behavior visually and interactively, directly connected to the server.
1. Install Java (JDK)
Download and extract OpenJDK 25. ( Minecraft Java webserver need Java to run 😊)
You can download java from the Adoptium website: https://adoptium.net/temurin/releases/
It will be installed in the folder C:\Program Files\Eclipse Adoptium\ so make sure that JAVA_HOME is setup correctly
2. Download Required Files
- Latest
BuildTools.jarfrom the Spigot project: https://www.spigotmc.org/wiki/buildtools/ visualmodder-1.21-20260324_1153.jaror later from our website
BuildTools is used to compile the Spigot server, while Visualmodder enables programmable logic inside Minecraft.
3. Compile Spigot Server
run the command:
java -jar BuildTools.jar --rev 1.21.11
This step downloads dependencies and builds spigot-1.21.11.jar.
4. Create Server Folder
Create a new folder where your Minecraft server will store its files (e.g., MyServer) and copy:
spigot-1.21.11.jarinto it.
5. First Server Start
java -jar spigot-1.21.11.jarThe server will start and then stop automatically. This is expected because you have not yet accepted the Minecraft EULA.
6. Accept EULA
The previous start produced a file eula.txt. Open it and change:
eula=falseto:
eula=trueThis confirms that you accept Mojang’s End User License Agreement, which is required to run a server.
7. Start Server Again
java -jar spigot-1.21.11.jarLet it fully start, then type in the console:
stopThis ensures all configuration files are generated properly.
8. Configure Offline Mode
Edit server.properties:
online-mode=falseThis allows offline accounts, which is useful for local testing.
9. Install and Configure Visualmodder
Copy the plugin file visualmodder-1.21-20260324_1153.jar into the subfolder:
plugins/Then edit:
plugins\visualmodder\visualmodder.propertiesChange:
MOJANG_NAME_VALIDATION=trueto:
MOJANG_NAME_VALIDATION=falseThis allows offline usernames to work with the plugin.
10. Start Server (Final Setup)
java -jar spigot-1.21.11.jarYour server is now ready.
11. Install and Launch Minecraft Client
- Download Minecraft from the official Mojang website https://www.minecraft.net/en-us/download
- There are other launchers (like the freesm Launcher or the TLauncher) that can be used for testing your setup but be aware that you need a licensed version of Minecraft for playing Minecraft.
- Launch the instance and choose the Minecraft release used in your server.
12. Connect to Your Server
Once you started Minecraft:
- Go to Multiplayer
- Select Direct Connection
- Enter:
127.0.0.1:25565Now you can connect to your local server and explore your world.
13. Open Visualmodder Web UI
http://localhost:10273/This opens the Visualmodder interface in your browser.
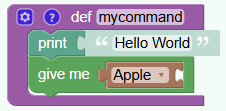
14. Create Your First Program
- Create the follwoing program by selecting the blocks from the left menu:
- From Functions take a function block: mycommand():
- From Text take a block “print(‘Hello World’)”
- From Items take a block “give me Apple”
On the top right corner of the editor page put your playername used in Minecraft. This is how the server can map your program to your player in Minecraft.

Press the red play button on the right for submitting the program to Minecraft. You should see a confirmation message that the program is ready. (Pressing the button can be skipped because it is automatically pressed when switching to Minecraft)
15. Run Your Command In-Game
In Minecraft:
Press the key 'f'. This opens a menu and your programs are listed as banners. Just click a banner and your program will start at your current position in the game.Alternatively you can open the command console and type
/vm mycommandthe /vm part is to indicate that you are running a visualmodder program
🎉 You see a message “Hello World” and receive an apple — your first Visualmodder program worked!
You can stop here or you can do some fine tuning as described in the following page
Fine Tuning of the Visualmodder plugin
Conclusion
You now have a working Spigot server with Visualmodder installed and your first custom command running. From here, you can expand into more complex scripts and gameplay logic.
Cheers, and happy coding in Minecraft!
Special Thanks to Vladimir Kalyaev who contributed to the creation of this tutorial.