Combining Blocks
In the previous sections of this course you learned how to create individual shapes such as squares, circles, and lines. You also learned how loops can repeat instructions so that the robot builder can construct large structures automatically.
In this section we take an important step forward: learning how to combine shapes and blocks to build more interesting and complex structures.
Most Minecraft buildings are not made from a single shape. A castle, for example, may include:
- Square walls
- Circular towers
- Decorative patterns
- Windows and doors
Each of these elements is built from simple shapes. By combining those shapes together we can create impressive structures.
Programming makes this process much easier because the robot builder can place hundreds or thousands of blocks automatically.
Instead of placing blocks by hand, we simply describe the structure using code.
The robot builder then follows the instructions and constructs the design.
Concepts You Will Learn
- How multiple shapes can form one structure
- How movement commands position shapes
- How loops create repeating patterns
- How blocks can form decorative designs
- How lines and shapes can form letters and numbers
In this section you will build several creative projects:
- Block Patterns
- Castle
- Chessboard
- Letter or Number Structures
Each project demonstrates a different way to combine shapes and blocks.
By the end of this section you will understand how complex Minecraft structures can be created from simple building commands.
In the next project we will begin with a decorative floor pattern that repeats blocks automatically.
Block Patterns Project
What We Will Build
In this project we will build a decorative block pattern across the ground.
Patterns are very common in Minecraft structures. They are often used in floors, pathways, gardens, and castle courtyards.
Many builders spend a lot of time placing patterned blocks by hand. Programming allows us to create these patterns automatically.
In this project the robot builder will place alternating blocks to create a repeating floor pattern.
Instead of manually placing every block, the program will repeat the same instructions many times.
This shows one of the greatest advantages of programming in Minecraft: small programs can create very large designs.
How the Program Works
The program follows a simple idea.
First we define a function that will contain our building instructions.
Then we use a loop to repeat a pattern of blocks several times.
Each repetition of the loop performs three steps:
- Place the first block
- Move forward
- Place the second block
By repeating this sequence many times, the robot creates a long decorative pattern.
This is a common technique used when building paths and floors in Minecraft worlds.
Understanding the Code Step by Step
Step 1 — Creating the Function
The program begins by defining a function.
def patterns():A function is a group of instructions that performs a task.
In this case the task is creating a decorative block pattern.
When we run the command inside Minecraft:
/vm patternsthe robot builder executes the instructions inside this function.
Step 2 — Creating the Loop
Next we create a loop.
for count in range(20):This loop repeats twenty times.
Each repetition will add another section to the pattern.
Loops are extremely useful for creating patterns because they repeat instructions automatically.
Step 3 — Placing the First Block
Inside the loop the robot places the first block.
vm.createBlock(Block.RED_WOOL)This command places a red wool block at the robot’s current position.
The command vm.createBlock places a single block.
It is useful for detailed designs where we want to place individual blocks.
Step 4 — Moving Forward
After placing the block, the robot moves forward.
vm.moveTo(1, Direction.FORWARD)This moves the robot forward by one block.
Movement commands are important because they determine where the next block will appear.
Step 5 — Placing the Second Block
Next the robot places a second block.
vm.createBlock(Block.WHITE_WOOL)Now the pattern contains two different colors.
Alternating colors is a simple way to create decorative patterns.
Step 6 — Moving Again
The robot moves forward again so the pattern can continue.
vm.moveTo(1, Direction.FORWARD)When the loop repeats, the robot will place the next pair of blocks.
After twenty repetitions, the pattern will stretch across the ground.
Python Code
#Python code: Create block patterns
def patterns():
  for count in range(20):
    vm.createBlock(Block.RED_WOOL)
    vm.moveTo(1, Direction.FORWARD)
    vm.createBlock(Block.WHITE_WOOL)
    vm.moveTo(1, Direction.FORWARD)
Understanding the Python Syntax
Loops
Loops repeat instructions automatically.
In this program the loop repeats the pattern twenty times.
vm.createBlock
This command places a single block.
It allows precise control over the placement of blocks.
vm.moveTo
This command moves the robot builder to a new position.
Movement commands determine where blocks will be placed next.
Try It Yourself
Try experimenting with the pattern program.
- Add more colors to the pattern.
- Make the pattern longer.
- Use different decorative blocks.
- Create patterns for floors or pathways.
Patterns are often used in castle courtyards, palace floors, and decorative gardens.
In the next project we will combine shapes to build a castle structure.
Castle Project
What We Will Build
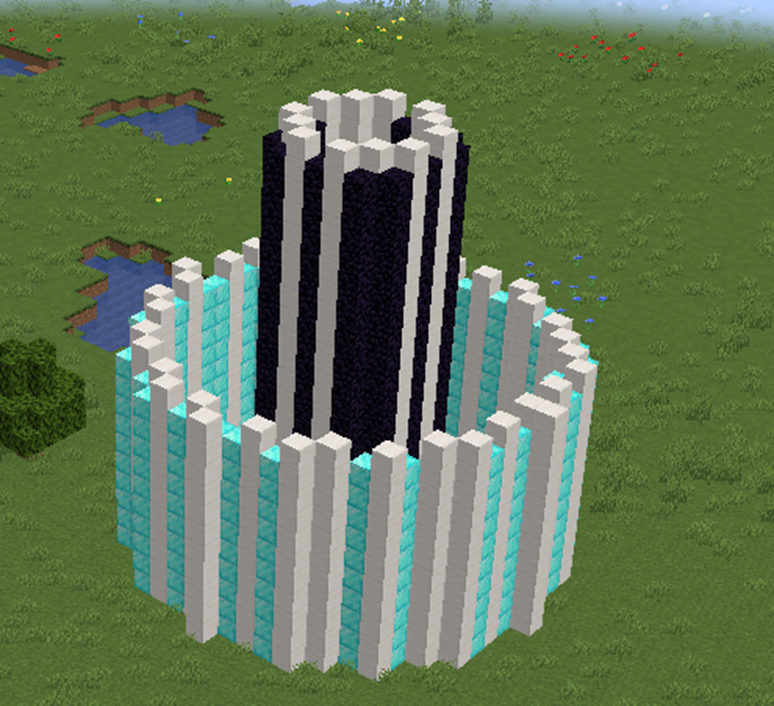
In this project we will build a simple castle structure using blocks and shapes.
Castles are a classic structure in Minecraft. Many players enjoy building them because they include walls, towers, and large courtyards.
A castle may look complicated, but it is actually built from simple shapes.
For example:
- The castle walls are large squares.
- The towers are circles.
- The courtyard is the open area inside the walls.
By combining these shapes together we can build a castle very quickly using code.
Instead of placing each block by hand, the robot builder will create the shapes automatically.
How the Program Works
The program builds the castle in two steps.
- Create the outer castle walls.
- Create a tower inside the walls.
The walls are built using a large square made of stone blocks.
The tower is built using a circle shape.
By combining these shapes we create the basic structure of a castle.
Understanding the Code Step by Step
Step 1 — Creating the Function
The program begins by defining a function.
def castle():This function contains the instructions for building the castle.
When we run the command in Minecraft:
/vm castlethe robot builder executes these instructions.
Step 2 — Creating the Castle Walls
The first structure we build is the castle wall.
vm.createSquare(20, False, Block.STONE)This command creates a large square frame made from stone blocks.
The parameters mean:
- 20 — the size of the square
- False — the square is hollow
- Block.STONE — the material used
This square forms the outer wall of the castle.
Because the square is hollow, the inside becomes a courtyard.
Step 3 — Moving to the Tower Position
Next the robot moves forward.
vm.moveTo(10, Direction.FORWARD)This moves the robot toward the center of the castle.
The next structure will appear at this new position.
Step 4 — Creating the Tower
Now the robot creates a tower.
vm.createCircle(4, False, Block.STONE)The parameters mean:
- 4 — the radius of the circle
- False — the circle is hollow
- Block.STONE — the material used
This circular structure forms a simple tower.
Circular shapes are often used when building towers because they look round and strong.
Python Code
#Python code: Create a castle
def castle():
  vm.createSquare(20, False, Block.STONE)
  vm.moveTo(10, Direction.FORWARD)
  vm.createCircle(4, False, Block.STONE)
Understanding the Python Syntax
vm.createSquare
This command creates square shapes made from blocks.
Squares are often used for walls, floors, and foundations.
vm.createCircle
This command creates circular rings of blocks.
Circles are useful for towers, domes, and decorative shapes.
vm.moveTo
This command moves the robot builder to a new position before creating the next structure.
Try It Yourself
Try modifying the castle program.
- Create larger castle walls.
- Add multiple towers.
- Use different materials such as stone bricks.
- Create gates or entrances.
You can also expand the program to create several towers around the walls.
In the next project we will create a chessboard pattern using repeating shapes.
Chessboard Project
What We Will Build
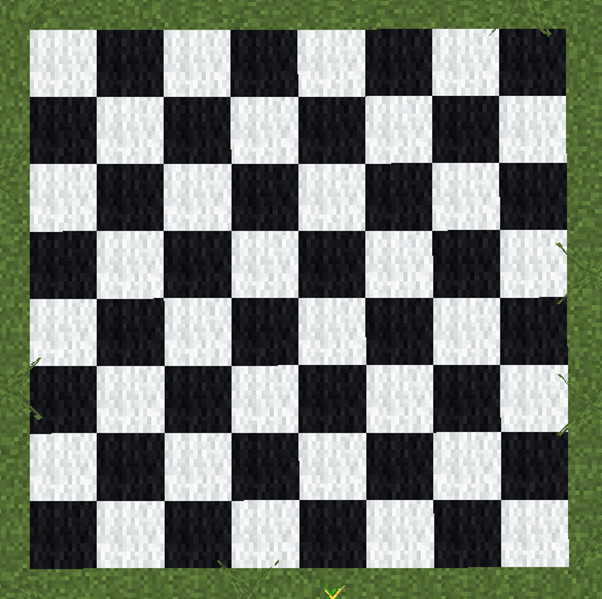
In this project we will build a chessboard pattern using blocks.
A chessboard is made of squares that alternate between two colors.
This pattern repeats across rows and columns to create a grid.
Chessboards are a great example of how programming can create repeating structures automatically.
Instead of placing every square manually, the robot builder will generate the entire board using loops.
This project also introduces an important programming idea: nested loops.
Nested loops are loops inside other loops.
They are very useful for creating grids and patterns.
How the Program Works
The chessboard is built row by row.
The program uses two loops:
- The first loop creates rows.
- The second loop creates squares within each row.
Inside the loops the program alternates between two block colors.
This creates the classic chessboard pattern.
Understanding the Code Step by Step
Step 1 — Creating the Function
The program begins with a function definition.
def chessboard():This function contains all the instructions needed to build the chessboard.
When we run the command inside Minecraft:
/vm chessboardthe robot builder executes the instructions inside the function.
Step 2 — Creating the Row Loop
Next we create the first loop.
for row in range(8):This loop creates eight rows.
Each repetition of the loop builds one row of the chessboard.
Step 3 — Creating the Column Loop
Inside the row loop we create another loop.
for column in range(8):This loop creates the squares inside the row.
Each repetition places one square.
Together these loops create an 8×8 grid.
Step 4 — Alternating Colors
To create the chessboard pattern we alternate between two colors.
if (row + column) % 2 == 0:This line checks whether the sum of the row and column numbers is even.
If the result is even, one color is used.
If the result is odd, another color is used.
This simple rule produces the alternating pattern seen on chessboards.
Step 5 — Creating the Squares
If the condition is true, the robot creates a white square.
vm.createSquare(2, True, Block.WHITE_WOOL)Otherwise the robot creates a black square.
vm.createSquare(2, True, Block.BLACK_WOOL)The squares are filled so the board appears solid.
Step 6 — Moving to the Next Position
After creating each square, the robot moves to the right.
vm.moveTo(2, Direction.RIGHT)This positions the robot for the next square.
When the row is finished, the robot returns to the beginning of the next row.
Python Code
#Python code: Create a chessboard
def chessboard():
  for row in range(8):
    for column in range(8):
      if (row + column) % 2 == 0:
        vm.createSquare(2, True, Block.WHITE_WOOL)
      else:
        vm.createSquare(2, True, Block.BLACK_WOOL)
      vm.moveTo(2, Direction.RIGHT)
    vm.moveTo(16, Direction.LEFT)
    vm.moveTo(2, Direction.FORWARD)
Understanding the Python Syntax
Nested Loops
Nested loops allow the program to repeat instructions in two directions.
This makes them perfect for building grid patterns like chessboards.
Conditional Statements
The if statement allows the program to choose between two options.
In this project it selects which block color should be used.
Movement Commands
Movement commands ensure that each square appears in the correct position.
Try It Yourself
Try modifying the chessboard program.
- Create a larger board.
- Use different colored blocks.
- Create a giant chess arena.
- Add a border around the board.
Patterns created with nested loops are extremely useful in Minecraft programming.
In the next project we will create letters and numbers using block shapes.
Letter or Number Structures Project
What We Will Build
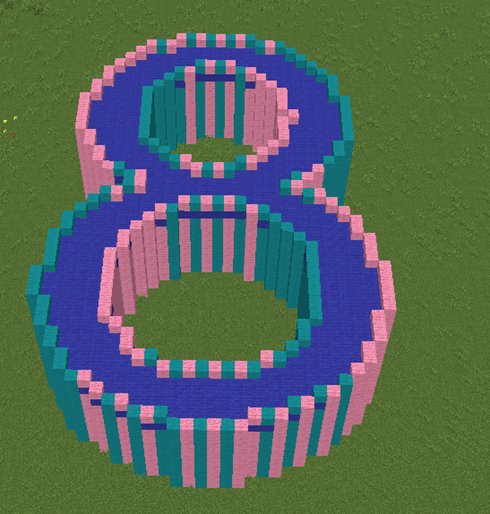
In this project we will build towers in the shape of large letters or numbers using Minecraft blocks.
Creating these structures manually can take a lot of time, but programming allows the robot builder to place the blocks quickly and accurately.
Understanding the Code Step by Step
Step 1 — Creating the Function
The program begins by defining a function.
def shape8():This function contains the instructions that build the number structure.
When we run the command inside Minecraft:
/vm shape8the robot builder executes the instructions inside this function.
Step 2 — Creating the First text
The robot begins by creating a text made ow wool in 2 colors
vm.createText('8', 60, True, [Block.PINK_WOOL, Block.CYAN_WOOL])The parameters mean:
- ‘8‘ — the text to write
- 60 — the aize of the font
- True — make just the border
- [Block.PINK_WOOL, Block.CYAN_WOOL] — the material used
This creates a bright golden line that will form part of the number.
Step 3 — Creating the walls
Repeating 10 times makes the ‘8’ into a tower
  for count in range(10):
    vm.createText('8', 60, True, [Block.PINK_WOOL, Block.CYAN_WOOL])
    vm.moveTo(1, Direction.UP)
This movement positions the robot so the next line appears beside the first one.
Movement commands are very important when creating shapes made from multiple pieces.
Step 4 — Fill in the roof
Go 2 blocks down so that an upper wall will be preserved
  vm.moveTo(2, Direction.DOWN)
  vm.createText(str('8'), 60, False, Block.BLUE_WOOL)
Python Code
#Python code: Create building in the shape of the number 8
def shape8():
  for count in range(10):
    vm.createText('8', 60, True, [Block.PINK_WOOL, Block.CYAN_WOOL])
    vm.moveTo(1, Direction.UP)
  vm.moveTo(2, Direction.DOWN)
  vm.createText(str('8'), 60, False, Block.BLUE_WOOL)
Understanding the Python Syntax
vm.createText
This command creates a text where yo specify the isze of the font and the baterial to be used.
vm.moveTo
This command moves the robot builder to a new location.
By combining movement with shapes we can build complex designs.
Try It Yourself
Now try creating your own letters or numbers.
- Create your initials.
- Build giant numbers.
- Design a welcome sign.
- Create pixel art symbols.
Combining simple shapes like lines, squares, and circles allows you to build almost any design in Minecraft.
This completes the Combining Blocks section.
In the next section you will learn how movement and shapes can work together to create drawings and pictures.