Until now, all of our Minecraft programs have used fixed numbers.
For example, when we created a square we might write:
vm.createSquare(8, False, Block.STONE)The number 8 is written directly in the code.
This works well, but it makes programs less flexible.
If we want to change the size of the structure later, we must search through the program and modify each number manually.
This is where variables become very useful.
A variable is a container that stores a value.
Instead of writing numbers directly in the code, we can store those numbers in variables and use the variable names instead.
This allows us to change the program easily by modifying only one value.
Variables are one of the most important ideas in programming.
They allow programs to become dynamic and adaptable.
In Minecraft programming, variables can control many aspects of a structure such as:
- The size of a building
- The number of blocks in a pattern
- The height of towers
- The spacing between shapes
In this section you will learn how variables work and how they allow you to build structures that change automatically.
Concepts You Will Learn
- What variables are
- How to create variables in Python
- How variables store values
- How variables control program behavior
- How variables allow flexible structures
Understanding Variables
A variable is created by assigning a value to a name.
For example:
size = 8This line of code creates a variable called size.
The value stored in the variable is 8.
Now the program can use the variable instead of writing the number directly.
For example:
vm.createSquare(size, False, Block.STONE)If we change the value of size, the square will automatically change size.
This makes the program easier to modify.
Why Variables Are Useful
Imagine building a chessboard.
A chessboard always has eight squares across and eight squares down.
If we wanted to create a larger chessboard, we would need to change many parts of the program.
But if we use variables, we only need to change one value.
The program will automatically adjust the entire structure.
This saves time and prevents mistakes.
Variable Names
Variables can have many different names.
Good variable names describe what the variable represents.
Examples of good variable names include:
- size
- height
- radius
- count
- length
Using clear names makes programs easier to understand.
Variables in Loops
Variables are often used inside loops.
For example:
for count in range(10):Here the variable count changes each time the loop repeats.
Variables like this help control how many times instructions are repeated.
Example Program Using Variables
Let’s look at a simple example that uses variables to control the size of shapes.
Step 1 — Creating the Function
First we define the function that will run the program.
def variableDemo():This function will create shapes using variables.
Step 2 — Defining the Variable
Next we create a variable called size.
size = 6This variable controls the size of the shapes.
Step 3 — Creating a Square
Now we use the variable when creating a square.
vm.createSquare(size, False, Block.BLUE_WOOL)Instead of writing a number directly, we use the variable.
This makes it easy to change the size later.
Step 4 — Changing the Variable
The program can also modify the variable.
size = size + 2This increases the value stored in the variable.
If we create another square after this, the square will be larger.
Understanding the Python Syntax
Assignment
The equals sign (=) assigns a value to a variable.
Example:
size = 6This stores the value 6 inside the variable called size.
Using Variables
Once a variable is created, it can be used anywhere in the program.
This makes programs flexible and easier to modify.
Example Code
#Python code: Demonstrating variables
def variableDemo():
  size = 6
  vm.createSquare(size, False, Block.BLUE_WOOL)
  size = size + 2
  vm.moveTo(10, Direction.FORWARD)
  vm.createSquare(size, False, Block.GREEN_WOOL)
Try It Yourself
Now experiment with variables in your own programs.
- Create a variable that controls the size of a circle.
- Create a variable that controls the height of a tower.
- Increase the variable inside a loop.
- Use variables to build shapes that grow larger each time.
Variables make programs much more powerful because they allow structures to change automatically.
In the next project we will use variables to build concentric squares that grow larger and larger.
Concentric Squares Project
What We Will Build
In this project we will build a pattern called concentric squares.
Concentric shapes are shapes that share the same center but have different sizes.
You may have seen concentric shapes in everyday life:
- The rings inside a tree trunk
- Ripples in water
- Targets used in archery
In our Minecraft program, we will create several squares that grow larger and larger.
All the squares will be centered in the same location, so they will appear as rings expanding outward.
This project is perfect for learning how variables can change during a loop.
Each time the loop runs, the square size will increase automatically.
Instead of writing many square commands manually, the robot builder will generate the entire pattern with only a few lines of code.
How the Program Works
The program works in a simple sequence:
- Create a variable that stores the size of the square.
- Start a loop that repeats several times.
- Create a square using the variable.
- Increase the size variable.
- Repeat the process.
Because the variable increases each time, every new square becomes larger.
The final result is a beautiful pattern of expanding squares.
Understanding the Code Step by Step
Step 1 — Creating the Function
The program begins with a function definition.
def concentric():This function contains all the instructions needed to create the square pattern.
When we run the command in Minecraft:
/vm concentricthe robot builder executes the instructions inside the function.
Step 2 — Creating the Variable
Next we create a variable that stores the size of the square.
size = 4This means the first square will have a size of 4 blocks.
The variable will change later during the program.
Step 3 — Creating the Loop
Now we start a loop that repeats several times.
for count in range(10):This loop repeats ten times.
Each repetition creates one square.
Because the variable size increases each time, every square will be larger than the previous one.
Step 4 — Creating the Square
Inside the loop, the robot creates a square using the size variable.
vm.createSquare(size, False, Block.YELLOW_WOOL)The parameters mean:
- size – the current value of the variable
- False – the square is hollow
- Block.YELLOW_WOOL – the material used
Because the square is hollow, we see only the outer border.
This allows the squares to appear as rings expanding outward.
Step 5 — Increasing the Variable
After creating the square, the program increases the value stored in the variable.
size = size + 4This line means:
Take the current value of size and add 4.
The result becomes the new value of the variable.
Because this happens during every loop repetition, the squares gradually become larger.
Understanding Important Commands
Variables
Variables store values that can change during a program.
In this project the variable controls the size of the squares.
Loops
Loops repeat instructions automatically.
Each repetition creates another square.
vm.createSquare
This command creates square shapes made of blocks.
Squares are commonly used for floors, frames, and decorative patterns.
Final Complete Code
#Python code: Create concentric squares
def concentric():
  size = 4
  for count in range(10):
    vm.createSquare(size, False, Block.YELLOW_WOOL)
    size = size + 4
Try It Yourself
Now experiment with the concentric squares program.
- Change the starting size.
- Increase the number of loop repetitions.
- Use different block types.
- Create concentric circles instead of squares.
You can also combine concentric patterns with movement commands to create decorative floors for buildings.
In the next project we will use variables to create a chessboard that can change size automatically.
Variable Chessboard Project
What We Will Build
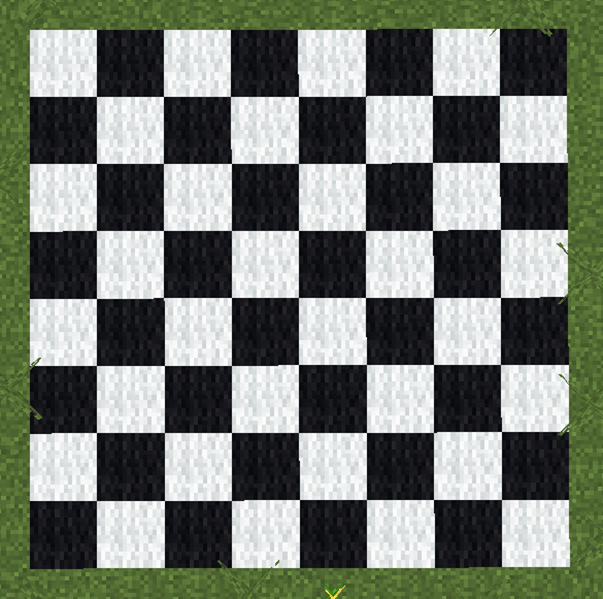
In this project we will create a chessboard pattern that can change size automatically.
A traditional chessboard has 8 rows and 8 columns of squares. The squares alternate between two colors, usually black and white.
Instead of building a chessboard with a fixed size, we will use variables so the board can grow or shrink depending on the values we choose.
This means we could easily create:
- A small 4×4 board
- A traditional 8×8 chessboard
- A giant decorative board in Minecraft
The program will use variables to control:
- The size of each square
- The number of squares in each row
- The number of rows
By adjusting these variables, the entire board changes automatically.
How the Program Works
The program creates the chessboard using two loops.
One loop builds the rows of the board.
The other loop builds the squares inside each row.
The program alternates between two block colors to create the chessboard pattern.
Variables control the number of squares and the size of each square.
Understanding the Code Step by Step
Step 1 — Creating the Function
The program begins with a function definition.
def chessboard():This function contains the instructions that build the chessboard.
When we run the command in Minecraft:
/vm chessboardthe robot builder executes the instructions inside the function.
Step 2 — Defining Variables
Next we create variables that control the board.
size = 4
count = 8
These variables represent:
- size – the size of each square
- count – the number of squares in each row
Because these values are stored in variables, we can easily change the entire board later.
Step 3 — Creating the Outer Loop
The first loop creates the rows of the chessboard.
for row in range(count):This loop repeats once for each row.
If the variable count is 8, the board will have 8 rows.
Step 4 — Creating the Inner Loop
Inside the row loop we create another loop.
for column in range(count):This loop creates each square in the row.
Each repetition places one square.
Step 5 — Alternating Colors
To create the chessboard pattern, the program alternates block colors.
If the row and column numbers add up to an even number, one color is used.
If the sum is odd, the other color is used.
This simple rule creates the alternating pattern.
Step 6 — Creating Each Square
Inside the loop the robot creates a filled square.
vm.createSquare(size, True, Block.WHITE_WOOL)or
vm.createSquare(size, True, Block.BLACK_WOOL)After creating each square, the robot moves to the position of the next square.
Step 7 — Moving to the Next Row
After finishing one row, the robot moves to the next row position.
This ensures the squares are arranged in a grid pattern.
Understanding Important Commands
Variables
Variables store values that control the structure of the program.
In this project variables control the board size and square size.
Nested Loops
Nested loops are loops inside other loops.
They are often used when building grids or patterns.
vm.createSquare
This command creates square shapes of blocks.
It is useful for building floors and patterns.
Final Complete Code
#Python code: Create a variable chessboard
def chessboard():
  size = 4
  count = 8
  for row in range(count):
    for column in range(count):
      if (row + column) % 2 == 0:
        vm.createSquare(size, True, Block.WHITE_WOOL)
      else:
        vm.createSquare(size, True, Block.BLACK_WOOL)
      vm.moveTo(size, Direction.RIGHT)
    vm.moveTo(size * count, Direction.LEFT)
    vm.moveTo(size, Direction.FORWARD)
Try It Yourself
Now experiment with the variable chessboard program.
- Change the board size by modifying the variable count.
- Change the square size using the variable size.
- Create giant chessboards for Minecraft mini-games.
- Replace the wool blocks with other materials.
Variables allow us to build structures that can easily change size and shape.
In the next project we will use variables to generate parkour platforms automatically.
Parkour Project
What We Will Build
In this project we will create a Minecraft parkour course using Python code.
Parkour is a popular Minecraft activity where players jump from one platform to another without falling.
Building a parkour course by hand can take a lot of time because every platform must be placed carefully.
Instead, we will use a program to automatically generate the platforms.
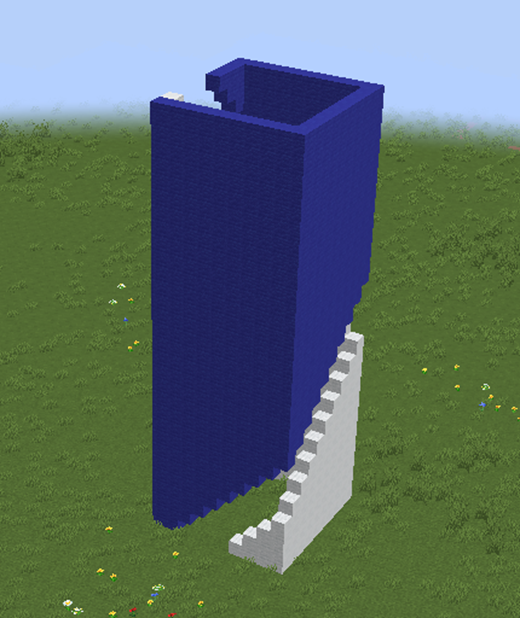
The course will stretch forward in front of the player and create a sequence of jump challenges.
Each platform will appear slightly higher than the previous one, forcing the player to climb upward while jumping.
This project shows how variables and loops can create structures that change automatically.
Instead of manually deciding the position of each platform, the program will calculate the positions while it runs.
How the Program Works
The program creates platforms step by step.
Each time the loop runs, the robot builder performs several actions:
- Create a platform.
- Move forward.
- Move upward.
Because the robot moves upward each time, the platforms gradually rise into the air.
The result is a staircase-like parkour course.
Variables control the size of the platforms and the number of jumps in the course.
Understanding the Code Step by Step
Step 1 — Creating the Function
The program begins with a function definition.
def parkour():This function contains the instructions that build the parkour course.
When we run the command in Minecraft:
/vm parkourthe robot builder executes the instructions inside the function.
Step 2 — Defining Variables
Next we define the variable num that defines the shift needed to create the next square with the opening moved forward
num = 2
vm.createSquare(10, False, [dict(AMOUNT=num, TYPE=Block.BLUE_WOOL), dict(AMOUNT=4, TYPE=Block.AIR), dict(AMOUNT=40, TYPE=Block.WHITE_WOOL)])
Notice the text: dict(AMOUNT=num,
this specifies that the blocks made of BLUE_WOOL are repeated ‘num’ times and the blocks of AIR are repeated 4 times
Step 3 — Creating the Loop
Next we create a loop that repeats once for each square.
for count in range(30):
    vm.createSquare(10, False, [dict(AMOUNT=num, TYPE=Block.BLUE_WOOL), dict(AMOUNT=4, TYPE=Block.AIR), dict(AMOUNT=40, TYPE=Block.WHITE_WOOL)])
    vm.moveTo(1, Direction.UP)
    num = num + 1
Step 4 — Creating the Platform
At the end we add some mobs and a prize

  vm.createLine(6, Block.WHITE_WOOL)
  vm.moveTo(1, Direction.UP)
  vm.createLine(5, Entity.SPIDER)
  vm.createChest(Item.GOLDEN_APPLE)
Important Commands
Variables
Variables store values that control the structure of the program.
In this project variables control the size and number of platforms.
Loops
Loops repeat instructions automatically.
The loop creates each platform in the course.
vm.createSquare
This command creates square shapes made of blocks.
It is commonly used to create floors or platforms.
vm.moveTo
This command moves the robot builder to a new position.
Movement commands allow the program to place platforms in different locations.
Final Complete Code
#Python code: Create a parkour course
def parkour():
  num = 2
  for count in range(30):
    vm.createSquare(10, False, [dict(AMOUNT=num, TYPE=Block.BLUE_WOOL), dict(AMOUNT=4, TYPE=Block.AIR), dict(AMOUNT=40, TYPE=Block.WHITE_WOOL)])
    vm.moveTo(1, Direction.UP)
    num = num + 1
  vm.createLine(6, Block.WHITE_WOOL)
  vm.moveTo(1, Direction.UP)
  vm.createLine(5, Entity.SPIDER)
  vm.createChest(Item.GOLDEN_APPLE)
Try It Yourself
Now experiment with the parkour generator program.
- Increase the number of platforms.
- Create larger or smaller platforms.
- Use different block types.
- Create a descending parkour course by moving downward.
You can even create parkour courses for multiplayer games in Minecraft.
In the next section we will explore advanced drawing techniques that combine everything you have learned so far.