As our Minecraft programs become larger and more complex, it becomes harder to manage all the instructions in one place.
If a program contains many lines of code, it can quickly become confusing to read and difficult to modify.
To solve this problem, programmers use a powerful concept called functions.
A function is a small program inside a larger program. It performs a specific task.
Instead of writing the same instructions many times, we can place those instructions inside a function and reuse them whenever we need them.
Functions help us organize code so it becomes easier to understand, maintain, and improve.
In Minecraft programming, functions are extremely useful because many structures are made from repeating patterns.
For example:
- A castle may contain many towers.
- A wall might repeat the same pattern many times.
- A decorative structure might contain the same shapes in several places.
Instead of rewriting the instructions every time, we can place them inside a function and call the function whenever we want the robot to perform that task.
This approach makes programs shorter and easier to change.
If we decide to modify the structure later, we only need to update the code inside the function.
Concepts You Will Learn
- What functions are
- How to create functions
- How to call functions
- Why functions make programs easier to manage
- How functions reduce repeated code
Why Functions Are Useful
Imagine you are building a large castle.
The castle might contain several towers that all look the same.
Without functions, you would need to write the tower-building instructions again and again.
This makes the program long and difficult to maintain.
But if we create a function called tower(), we can write the instructions once and call the function many times.
The robot builder will execute the same instructions every time the function is called.
This saves time and keeps the program organized.
Creating a Function
In Python, a function is created using the def keyword.
For example:
def circle():This line defines a new function called circle.
All instructions written below this line belong to the function.
When the function is called, the robot will perform those instructions.
Calling a Function
Once a function is created, we can run it by writing its name.
For example:
circle()This tells the program to execute the instructions inside the circle function.
A program can call a function many times.
Each time the function runs, the robot performs the same task.
Example Program Using Functions
Let’s look at an example where functions are used to organize a program.
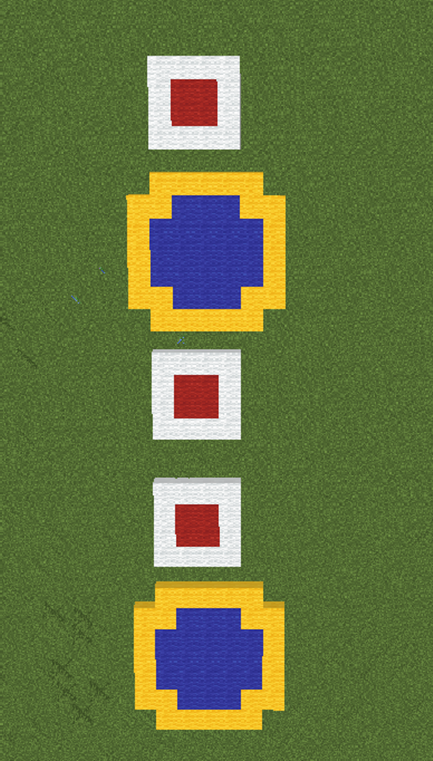
This program creates circles and squares in a repeating pattern.
Instead of writing the instructions for circles and squares multiple times, the program places them inside separate functions.
Step 1 — The Main Function
The main function controls the order of the shapes.
def functions():
  square()
  circle()
  square()
  square()
  circle()
This function does not build shapes directly.
Instead, it calls other functions that perform the work.
Each time the program calls square() or circle(), the robot builds that shape.
Step 2 — The Circle Function
Next we create the function that builds circles.
def circle():
  vm.createCircle(4, True, Block.BLUE_WOOL)
  vm.createCircle(4, False, Block.YELLOW_WOOL)
  vm.moveTo(7, Direction.FORWARD)
This function creates a blue filled circle and adds a yellow border.
Then the robot moves forward so the next shape does not overlap the previous one.
Step 3 — The Square Function
Now we create the function that builds squares.
def square():
  vm.createSquare(4, True, Block.RED_WOOL)
  vm.createSquare(4, False, Block.WHITE_WOOL)
  vm.moveTo(6, Direction.FORWARD)
This function creates a filled red square and adds a white border.
After building the square, the robot moves forward to prepare for the next shape.
Understanding the Python Syntax
def
The def keyword defines a new function.
Every function must have a name.
Function Calls
Writing the function name followed by parentheses runs the function.
For example:
circle()This executes the instructions inside the circle function.
Organizing Code
By dividing the program into functions, the code becomes easier to read.
Instead of seeing many instructions at once, we see the program as a series of tasks.
Final Complete Code
#Python code: Multiple functions
def functions():
  square()
  circle()
  square()
  square()
  circle()

def circle():
  vm.createCircle(4, True, Block.BLUE_WOOL)
  vm.createCircle(4, False, Block.YELLOW_WOOL)
  vm.moveTo(7, Direction.FORWARD)

def square():
  vm.createSquare(4, True, Block.RED_WOOL)
  vm.createSquare(4, False, Block.WHITE_WOOL)
  vm.moveTo(6, Direction.FORWARD)
Try It Yourself
Now experiment with functions in your own programs.
- Create a function that builds a tower.
- Create a function that builds a wall.
- Call the same function several times to build a structure.
- Modify the shapes inside the functions.
Functions are one of the most powerful tools in programming.
In the next project we will use functions to build a large structure: a hot air balloon.
Hot Air Balloon Project
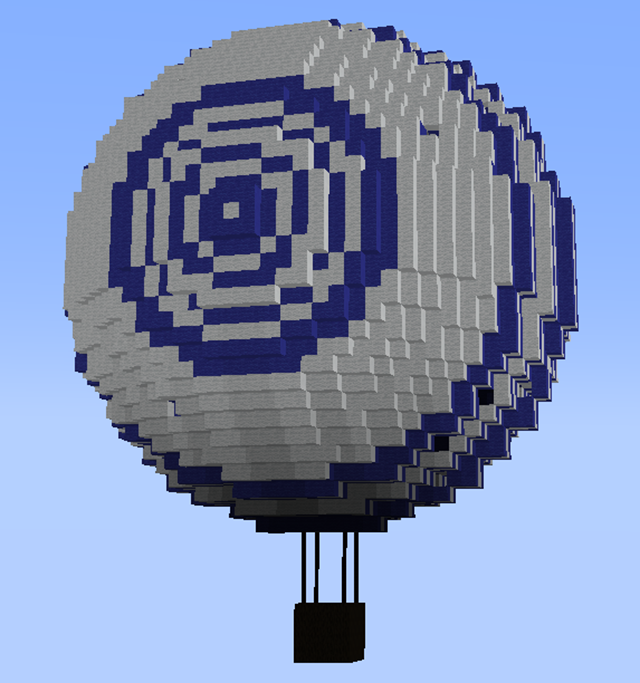
What We Will Build
In this project we will build a large hot air balloon floating above the ground.
A hot air balloon has several parts:
- A basket where passengers stand
- Ropes connecting the basket to the balloon
- A large balloon that floats in the air
Instead of writing one long program, we will organize our code using functions.
Each part of the structure will have its own function.
This makes the program easier to read and easier to modify later.
The three main functions we will create are:
- chest() – builds the basket
- rope() – builds the ropes
- ball() – builds the balloon
Finally, a main function will call all three functions to assemble the complete hot air balloon.
How the Program Works
The program is organized like a construction plan.
First the basket is created.
Then the ropes connect the basket to the balloon.
Finally the large balloon is built above the basket.
Each of these steps is performed by a separate function.
This makes the program easier to understand because each function focuses on a single task.
Understanding the Code Step by Step
Step 1 — The Main Function
The program begins with a function that assembles the entire structure.
def balloon():
  chest(); rope(); ball()
This function calls three other functions.
Each function builds one part of the hot air balloon.
The robot builder performs the tasks in the order they appear.
First the basket is built, then the ropes, and finally the balloon.
Step 2 — Building the Balloon
The balloon itself is built using circles that rotate gradually.
def ball():
  vm.moveTo(16, Direction.UP)
The robot first moves upward to create space above the basket.
Next we create the balloon using a loop.
for count in range(60):This loop repeats 60 times.
Inside the loop the robot performs two actions:
- Change the inclination
- Create a circular ring of blocks
The inclination change is:
vm.changeInclination(3)This tilts the robot slightly upward each time.
Then the robot creates a circular ring.
vm.createCircle(18, False, [Block.BLUE_WOOL, Block.WHITE_WOOL])The block list alternates between blue and white wool.
This gives the balloon a striped pattern.
As the loop repeats, the circles gradually form a spherical balloon.
Step 3 — Building the Ropes
The ropes connect the basket to the balloon.
They are created using rectangles stacked vertically.
def rope():
  for count2 in range(7):
This loop repeats seven times.
Each repetition creates one layer of the rope.
The robot creates a rectangular shape using fence blocks.
vm.createRectangle(4, 4, False, [Block.DARK_OAK_FENCE, dict(AMOUNT=2, TYPE=Block.AIR)])The fences form the rope structure.
After creating each rectangle, the robot moves upward.
vm.moveTo(1, Direction.UP)This causes the rope to grow vertically.
Step 4 — Building the Basket
The basket is built using wooden blocks.
def chest():
  vm.createRectangle(4, 4, True, Block.OAK_WOOD)
This creates the base of the basket.
Next the robot moves upward.
vm.moveTo(1, Direction.UP)Now we create the walls of the basket using a loop.
for count3 in range(3):This loop repeats three times to create the sides of the basket.
Each repetition builds another wooden layer.
vm.createRectangle(4, 4, False, Block.OAK_WOOD)Then the robot moves upward again to prepare for the next layer.
vm.moveTo(1, Direction.UP)Understanding Important Commands
Functions
Functions divide a program into smaller tasks.
Each function builds one part of the structure.
Loops
Loops repeat instructions automatically.
They are useful for building structures that grow upward or repeat patterns.
vm.createCircle
This command creates circular rings of blocks.
When combined with rotation, it can create spherical shapes.
vm.createRectangle
This command creates rectangular shapes.
It is useful for building floors, walls, and platforms.
Final Complete Code
#Python code: Create an air balloon with a chest for the passengers
def balloon():
  chest(); rope(); ball()

def ball():
  vm.moveTo(16, Direction.UP)
  for count in range(60):
    vm.changeInclination(3)
    vm.createCircle(18, False, [Block.BLUE_WOOL, Block.WHITE_WOOL])

def rope():
  for count2 in range(7):
    vm.createRectangle(4, 4, False, [Block.DARK_OAK_FENCE, dict(AMOUNT=2, TYPE=Block.AIR)])
    vm.moveTo(1, Direction.UP)

def chest():
  vm.createRectangle(4, 4, True, Block.OAK_WOOD)
  vm.moveTo(1, Direction.UP)
  for count3 in range(3):
    vm.createRectangle(4, 4, False, Block.OAK_WOOD)
    vm.moveTo(1, Direction.UP)
Try It Yourself
Try experimenting with the hot air balloon program.
- Change the colors of the balloon.
- Create a larger basket.
- Add decorative patterns to the balloon.
- Create multiple balloons floating in the sky.
Functions make it easy to modify large programs.
In the next lesson we will learn how to use functions to build castles with towers placed around a circle.
Castle with Towers Project
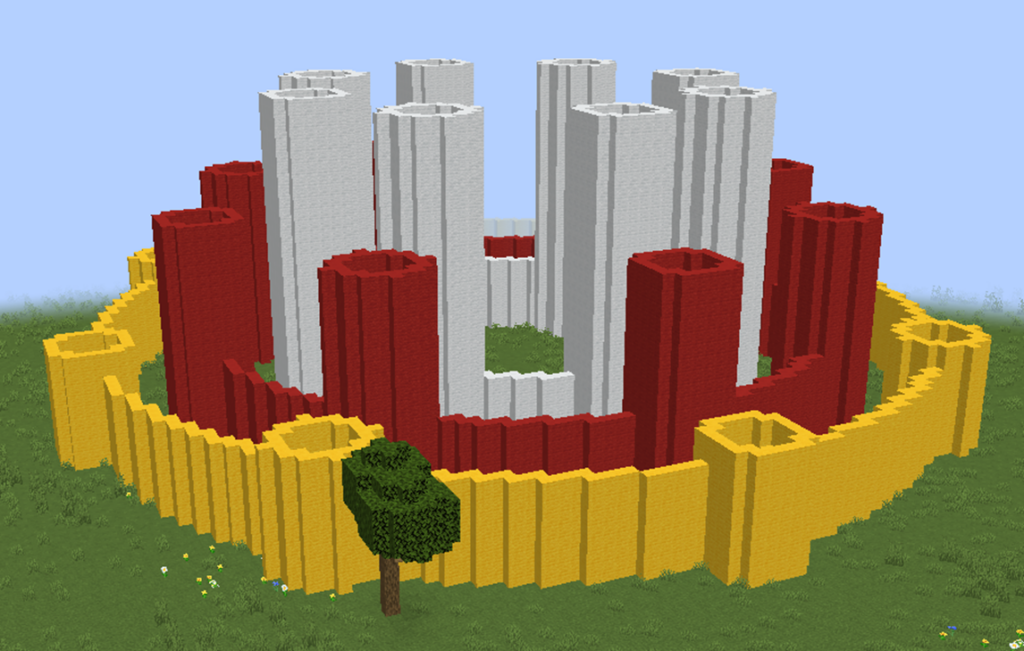
What We Will Build
In this project we will build a circular castle surrounded by towers.
The towers will be placed evenly around the player to create a ring-shaped fortress.
Instead of placing towers manually in many different positions, we will use rotation and functions to automatically place them around a circle.
This project is a perfect example of how functions help organize complex structures.
The castle will be built using repeated towers arranged around the player. Each tower will appear at a different angle, forming a circular wall of towers.
When the robot rotates slightly after each tower, the towers spread evenly around the circle.
This technique allows us to create symmetrical structures easily.
How the Program Works
The program follows a simple strategy.
- Move the robot outward from the player.
- Create a circular tower.
- Return to the starting position.
- Rotate slightly.
- Repeat the process several times.
By repeating these steps, towers are placed evenly around the player.
The final result is a circular castle surrounded by towers.
Understanding the Code Step by Step
Step 1 — Creating the Function
The program begins with a function definition.
def castle():This function contains all the instructions needed to build the castle.
When we run the command in Minecraft:
/vm castlethe robot builder will execute the instructions inside this function.
Step 2 — Creating the Loop
Next we use a loop to repeat the tower creation process.
for count in range(8):This loop repeats eight times.
Each repetition creates one tower.
Because the towers are placed around a circle, eight repetitions will produce eight towers.
Step 3 — Moving Away from the Center
Before creating each tower, the robot moves outward from the player.
vm.moveTo(20, Direction.FORWARD)This moves the robot twenty blocks forward.
This distance determines how far the towers are from the center.
Step 4 — Creating the Tower
Once the robot reaches the tower location, it creates a circular tower base.
vm.createCircle(4, False, Block.WHITE_WOOL)The parameters mean:
- 4 – the radius of the tower
- False – the circle is hollow
- Block.WHITE_WOOL – the material used
This command creates the base ring of the tower.
Step 5 — Returning to the Start
After creating the tower, the robot returns to the original position.
vm.moveTo(Position.START)This ensures that the next tower starts from the center again.
If we did not return to the center, the towers would form a spiral instead of a circle.
Step 6 — Rotating the Robot
Next the robot rotates slightly.
vm.changeDirection(45)This rotates the robot by 45 degrees.
Because the loop repeats eight times, the robot completes a full circle:
8 × 45 = 360 degrees
This evenly distributes the towers around the circle.
Understanding Important Commands
Functions
Functions group instructions into reusable tasks.
In this project the entire castle-building process is contained in one function.
Loops
Loops repeat instructions automatically.
The loop here creates multiple towers around the castle.
vm.changeDirection
This command rotates the robot horizontally.
By rotating the robot slightly between towers, we distribute them evenly around the center.
vm.moveTo(Position.START)
This command moves the robot back to its original starting point.
This is very useful when building symmetrical structures.
Final Complete Code
#Python code: Create circles around the player
def castle():
  for count in range(8):
    vm.moveTo(20, Direction.FORWARD)
    vm.createCircle(4, False, Block.WHITE_WOOL)
    vm.moveTo(Position.START)
    vm.changeDirection(45)
Try It Yourself
Now experiment with the castle program.
- Increase the number of towers.
- Change the radius of the towers.
- Use stone blocks instead of wool.
- Add walls between the towers.
You could even create a huge fortress with dozens of towers by adjusting the loop and rotation angle.
In the next lesson we will explore how functions can be used to create programmable potions that trigger building commands.
Programmable Potions Project
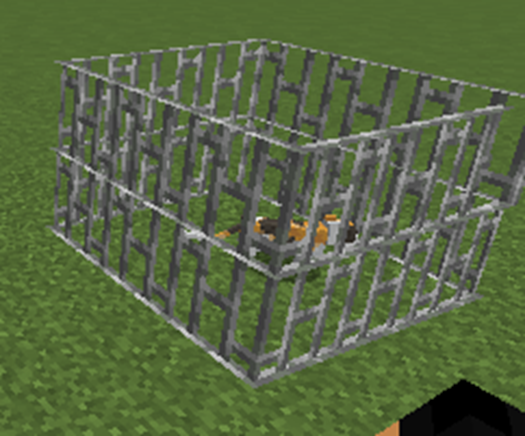
What We Will Build
In this project we will create a special potion that triggers a building program when it is used.
Normally, potions in Minecraft give players special abilities like healing or speed.
But with programming we can create custom potions that activate our own functions.
In this example, the potion will create a cage when it is thrown.
This type of tool can be used for many fun activities in Minecraft, such as:
- Creating traps
- Building instant structures
- Spawning animals
- Starting mini-games
When the player throws the potion, the function associated with the potion will run automatically.
In this project the potion will trigger a function that builds a cage around the impact location.
How the Program Works
The program uses two functions:
- A function that gives the player the potion
- A function that builds the cage
When the potion is thrown, the cage function is executed automatically.
This demonstrates how functions can interact with Minecraft items and player actions.
Understanding the Code Step by Step
Step 1 — Creating the Potion Function
The first function gives the player a special splash potion.
def trap():This function will give the player a potion item.
When the player uses the potion, it will trigger another function.
Step 2 — Giving the Potion to the Player
Inside the function we use the command:
vm.giveToPlayer(Equip.INVENTORY, [dict(POTION="cage", TYPE=Item.SPLASH_POTION)])This command places a splash potion in the player’s inventory.
The parameters of this command define the type of item and the function it will trigger.
- Equip.INVENTORY – the item will appear in the player’s inventory
- POTION=”cage” – the potion will activate the cage function
- Item.SPLASH_POTION – the item is a throwable potion
When the potion is thrown, the cage() function will run.
Step 3 — Creating the Cage Function
Next we define the function that builds the cage.
def cage():This function creates a small cage made of iron bars.
The cage will surround the location where the potion lands.
Step 4 — Creating the Bottom of the Cage
The first instruction creates a square made of iron bars.
vm.createSquare(4, False, Block.IRON_BARS)The parameters mean:
- 4 – the size of the cage
- False – the square is hollow
- Block.IRON_BARS – the material used
This creates the base of the cage.
Step 5 — Moving Upward
Next the robot moves upward.
vm.moveTo(1, Direction.UP)This allows the cage to have height.
Step 6 — Creating the Top of the Cage
After moving upward, another square is created.
vm.createSquare(4, False, Block.IRON_BARS)This forms the top part of the cage.
Together, the two squares create a small enclosure made of iron bars.
Understanding Important Commands
vm.giveToPlayer
This command gives items directly to the player.
In this program it gives the player a potion that activates a function.
Functions
Functions allow us to separate different tasks in our program.
In this project one function creates the potion and another function builds the cage.
vm.createSquare
This command creates square shapes of blocks.
It is often used to build walls, floors, and enclosures.
Final Complete Code
#Python code: give to the player a splash potion that generates a cage when used
def trap():
  vm.giveToPlayer(Equip.INVENTORY, [dict(POTION="cage", TYPE=Item.SPLASH_POTION)])

def cage():
  vm.createSquare(4, False, Block.IRON_BARS)
  vm.moveTo(1, Direction.UP)
  vm.createSquare(4, False, Block.IRON_BARS)
Try It Yourself
Now experiment with programmable potions.
- Create a potion that builds a tower.
- Create a potion that spawns animals.
- Create a potion that builds walls.
- Create a potion that drops treasure.
These programmable potions can be used to create exciting games and challenges in Minecraft.
For example, players could throw potions to trap each other during a multiplayer mini-game.
In the next section we will learn about variables and how they allow programs to store and change values.