Until now, our robot builder has been able to move forward, backward, left, right, and up. This already allows us to build many interesting structures in Minecraft.
However, there is another powerful ability that makes our programs much more creative: the ability to rotate.
Rotation allows the robot to turn before building the next structure. Instead of always building in the same direction, the robot can rotate step by step and create patterns around itself.
This technique is used to create many impressive structures such as:
- Stars
- Sun shapes
- Spirals
- Rotating staircases
- Radial patterns
In Minecraft programming, rotation allows us to repeat shapes around a central point. When we combine loops and rotation, a simple line of blocks can become a complex pattern.
In this section you will build several creative projects:
- A sun made from rotating lines of blocks
- A rotating staircase that twists as it grows
- A flower thrower that creates rows of flowers in the direction you face
Each of these projects will introduce new commands that allow us to control the direction of the robot.
Concepts You Will Learn
- What angles are and how they describe rotation
- How to rotate the robot using direction commands
- How loops and rotation combine to create radial shapes
- How to use rotation to build patterns
- How to use direction commands to build relative to the player’s orientation
Understanding Angles
Before we start coding with rotation, we need to understand what an angle is.
An angle describes how much something has rotated from its original direction.
Angles are measured in degrees.
A full rotation around a circle equals:
360 degrees
If the robot rotates 360 degrees, it ends up facing the same direction it started.
Here are some common angles used in programming:
- 90 degrees – a quarter turn
- 180 degrees – half a turn
- 270 degrees – three quarters of a turn
- 360 degrees – a full rotation
For example:
If a robot turns 90 degrees, it turns right.
If it turns 180 degrees, it turns completely around.
By combining smaller angles inside loops, we can rotate gradually and create circular shapes.
The changeDirection Command
The command used to rotate the robot is:
vm.changeDirection(angle)This command rotates the robot by a certain number of degrees.
For example:
vm.changeDirection(90)This rotates the robot by 90 degrees.
If the robot builds something after rotating, the structure will appear in the new direction.
This simple command allows us to create many interesting patterns.
Combining Rotation with Loops
Rotation becomes especially powerful when combined with loops.
Imagine we build a line of blocks, then rotate slightly, and build another line.
If we repeat this many times, the lines will spread around a circle.
This technique is called a radial pattern.
Radial patterns appear often in nature.
Examples include:
- The rays of the sun
- The petals of flowers
- Spokes of a wheel
By rotating a little bit after each repetition, our robot can create these patterns automatically.
In the next project we will use this technique to build a sun shape in Minecraft.
Sun Project
What We Will Build
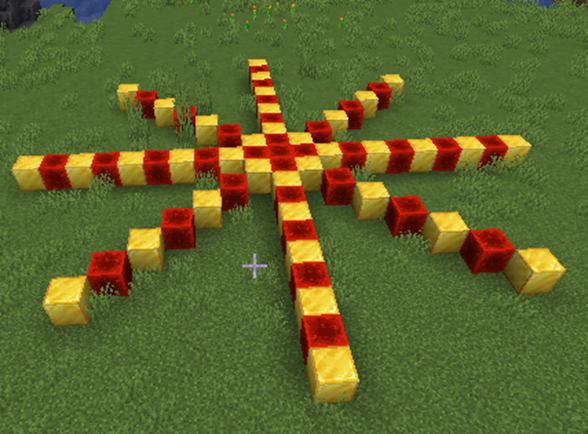
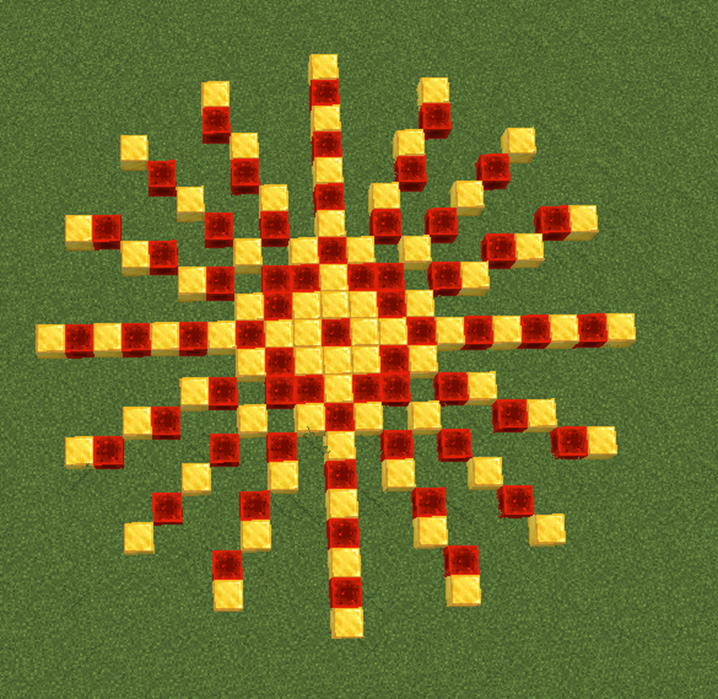
In this project we will create a large sun shape made of blocks.
The sun will look like a star with rays spreading out in every direction.
Each ray will be a line of blocks, and the robot will rotate a little after creating each line.
By repeating this process several times, the rays will spread around a circle and form a beautiful sun pattern.
This project teaches one of the most important ideas in Minecraft programming: rotation combined with loops can create radial patterns.
Radial patterns are shapes that spread outward from a central point.
Examples of radial patterns include:
- The sun
- Snowflakes
- Flowers
- Fireworks
The robot builder will remain in the center of the sun while rotating slightly after drawing each ray.
Because the robot rotates a small amount every time, the lines spread evenly around the circle.
How the Program Works
The program works in a simple sequence:
- Create a line of blocks.
- Rotate the robot a small amount.
- Repeat the process several times.
When this sequence is repeated eight times, the lines form a star pattern.
Because each line uses two alternating block types, the rays have a colorful appearance.
Understanding the Code Step by Step
Step 1 — Creating the Function
Every program begins with a function definition.
def sun():A function groups instructions into a reusable command.
When we run the command in Minecraft:
/vm sunthe robot executes all instructions inside this function.
Step 2 — Starting the Loop
The sun shape requires repeating the same steps several times.
To do this, we use a loop.
for count in range(8):This loop repeats the instructions inside it eight times.
Each repetition creates one ray of the sun.
Because the loop runs eight times, the sun will have eight rays.
Step 3 — Creating a Line of Blocks
Inside the loop, the first instruction creates a line of blocks.
vm.createLine(21, [Block.GOLD_BLOCK, Block.REDSTONE_BLOCK])This command uses the VisualModder function:
vm.createLine(length, blocks)Let’s understand the parameters.
- 21 – The length of the line.
- [Block.GOLD_BLOCK, Block.REDSTONE_BLOCK] – A list of blocks used alternately.
Because we use a list of blocks, the robot alternates between gold blocks and redstone blocks.
This gives the sun rays a decorative pattern.
Step 4 — Rotating the Robot
After drawing the line, the robot rotates slightly.
vm.changeDirection(22.5)This command rotates the robot by 22.5 degrees.
Because the loop repeats eight times, the robot rotates gradually around the center.
The total rotation becomes:
8 × 22.5 = 180 degrees
This creates a balanced pattern of rays spreading outward.
Understanding Important Commands
Let’s review the key commands used in this project.
vm.createLine
This command creates a straight line of blocks.
The first parameter defines the length of the line.
The second parameter defines the block type or list of block types.
Using lists allows the robot to alternate materials automatically.
vm.changeDirection
This command rotates the robot by a specific angle.
After rotating, any new shapes will be built in the new direction.
This allows us to build circular patterns.
Loops
Loops repeat instructions automatically.
In this project the loop creates multiple rays without repeating code.
Why 22.5 Degrees?
You might wonder why we rotate exactly 22.5 degrees.
This value was chosen so the rays spread evenly around the circle.
If we wanted more rays, we could rotate by a smaller angle.
For example:
- 45 degrees → 8 rays
- 22.5 degrees → 16 rays
- 10 degrees → 36 rays
By adjusting the rotation angle, we can control how many rays appear.
Final Complete Code
#Python code: Create a sun shape
def sun():
  for count in range(8):
    vm.createLine(21, [Block.GOLD_BLOCK, Block.REDSTONE_BLOCK])
    vm.changeDirection(22.5)
Try It Yourself
Now it is your turn to experiment with the sun program.
- Increase the number of loop repetitions.
- Use different block types.
- Change the length of the rays.
- Try different rotation angles.
You could also combine multiple sun shapes to create fireworks in the sky.
In the next project we will use rotation and vertical movement to build a rotating staircase.
Rotating Stair Project
What We Will Build
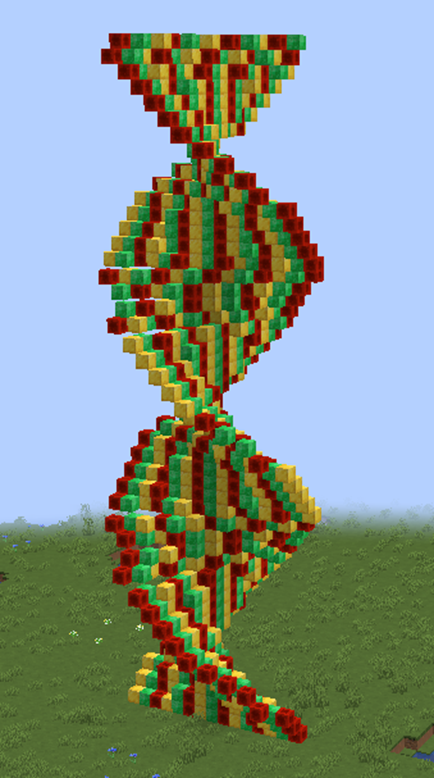
In this project we will build a rotating staircase that spirals upward into the sky.
A spiral staircase is a perfect example of how rotation and movement can work together. Instead of building straight up, the robot will slowly rotate while creating rows of blocks.
As the robot climbs higher and rotates slightly after each step, the structure forms a spiral shape.
This kind of structure appears often in architecture. Spiral staircases are used in towers, castles, and lighthouses.
In Minecraft, building a spiral staircase manually would require placing hundreds of blocks carefully.
But with programming, the robot builder can create the entire staircase automatically.
This project will teach you how to combine three important ideas:
- Loops
- Movement
- Rotation
When these ideas are combined, the robot can build structures that twist and grow at the same time.
How the Program Works
The staircase is built using a loop.
Each time the loop runs, the robot performs three actions:
- Create a row of blocks.
- Move upward to the next level.
- Rotate slightly before building the next step.
Because the robot rotates after every step, the rows slowly turn around the center.
As the robot moves upward during each repetition, the staircase rises higher and higher.
The final result is a spiral staircase that twists as it climbs.
Understanding the Code Step by Step
Step 1 — Creating the Function
Every VisualModder Python program begins with a function.
def sun():Although the function name here is sun, the program actually builds a rotating staircase.
The name of a function does not change how the program works.
What matters are the instructions inside the function.
When we type the command in Minecraft:
/vm sunthe robot executes the instructions that create the staircase.
Step 2 — Starting the Loop
The staircase is built step by step using a loop.
for count in range(8):This loop repeats eight times.
Each repetition builds one section of the staircase.
Because the robot moves upward during each repetition, the staircase grows taller.
Step 3 — Creating a Row of Blocks
Inside the loop, the robot first creates a row of blocks.
vm.createLine(21, [Block.GOLD_BLOCK, Block.REDSTONE_BLOCK])The VisualModder function used here is:
vm.createLine(length, blocks)Let’s understand the parameters.
- 21 – The length of the row.
- [Block.GOLD_BLOCK, Block.REDSTONE_BLOCK] – A list of alternating blocks.
Because the blocks alternate, the staircase steps have a decorative pattern.
This row of blocks becomes one step of the spiral staircase.
Step 4 — Rotating the Staircase
After creating the row, the robot rotates slightly.
vm.changeDirection(22.5)This command rotates the robot by 22.5 degrees.
Because the loop repeats several times, the robot rotates gradually.
The staircase slowly turns around the center point.
Understanding the Key Commands
Let’s review the important commands used in this program.
vm.createLine
This command creates a straight line of blocks.
Lines are useful for paths, walls, and stair steps.
vm.changeDirection
This command rotates the robot by a specific angle.
After rotating, the next structure will be built in the new direction.
Loops
Loops repeat instructions automatically.
In this program the loop builds multiple steps of the staircase.
Without loops we would have to repeat the same instructions many times.
How the Spiral Is Created
The spiral staircase appears because two things happen inside the loop:
- The robot rotates a little
- The robot builds another step
When this sequence repeats several times, the steps gradually turn around the center.
This creates the spiral effect.
If we increase the number of repetitions, the staircase will become taller.
If we decrease the rotation angle, the spiral will become tighter.
Final Complete Code
#Python code: Create a rotating stair
def sun():
  for count in range(8):
    vm.createLine(21, [Block.GOLD_BLOCK, Block.REDSTONE_BLOCK])
    vm.changeDirection(22.5)
Try It Yourself
Now experiment with your rotating staircase program.
- Increase the loop count to build a taller staircase.
- Use different block types for the steps.
- Change the rotation angle.
- Make the steps longer or shorter.
You could even build a giant spiral tower around your Minecraft base.
In the next project we will learn how to create rows of flowers that appear in the direction the player is facing.
Flower Thrower Project
What We Will Build
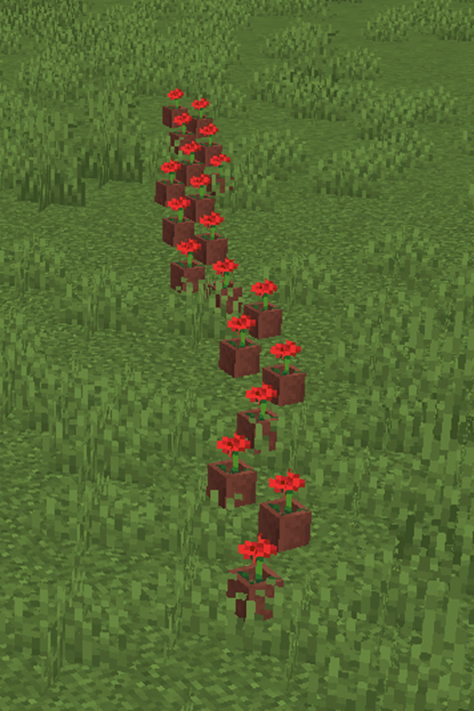
In this project we will create a fun tool called the Flower Thrower.
The Flower Thrower creates a row of flowers in the direction the player is looking.
This means the robot builder will first check the direction the player is facing, then build a long line of flowers in that same direction.
This is different from previous projects. In earlier programs the robot always started facing the same direction.
Now the robot will align itself with the player before building.
This allows the program to react to the player’s position and direction.
The result is a fun effect: wherever you look, flowers will appear in front of you.
This project introduces an important command that allows the robot to match the player’s orientation.
How the Program Works
The Flower Thrower program works in three simple steps:
- Align the robot’s direction with the player’s direction.
- Repeat a movement several times.
- Create a flower at each step.
The robot moves forward and places flowers repeatedly, creating a long line of plants.
Because the robot uses the player’s direction as its starting orientation, the flowers will always grow in front of the player.
Understanding the Code Step by Step
Step 1 — Creating the Function
Every program begins with a function definition.
def flowers():This function contains all the instructions required to create the row of flowers.
When we run the command in Minecraft:
/vm flowersthe robot executes the instructions inside this function.
Step 2 — Aligning with the Player
The next command tells the robot to face the same direction as the player.
vm.setDirection(Compass.SAME_AS_PLAYER)This command is extremely useful because it allows the program to respond to the player’s orientation.
The robot now faces exactly the same direction as the player.
If the player turns around and runs the command again, the flowers will appear in the new direction.
This makes the program interactive and dynamic.
Step 3 — Creating the Loop
Next we use a loop to repeat the flower creation process.
for count in range(20):This loop repeats twenty times.
Each repetition creates one flower and moves the robot forward.
Because the loop runs twenty times, the program will create a row of twenty flowers.
Step 4 — Moving Forward
Inside the loop, the robot first moves forward.
vm.moveTo(1, Direction.FORWARD)This moves the robot forward one block.
After the movement, the robot places a flower at its new position.
Step 5 — Creating the Flower
The next command places a flower.
vm.createBlock(Block.POTTED_POPPY)This command creates a potted poppy block.
Because the command runs inside the loop, the robot creates a flower every time it moves forward.
The result is a row of flowers stretching across the ground.
Understanding Important Commands
Let’s review the most important commands used in this project.
vm.setDirection
This command sets the robot’s orientation.
In this program we use:
Compass.SAME_AS_PLAYERThis means the robot will face the same direction as the player.
This is useful when we want the program to respond to the player’s actions.
vm.moveTo
This command moves the robot in a specific direction.
In this case the robot moves forward one block each time the loop repeats.
vm.createBlock
This command places a single block.
In this project the block used is a potted poppy.
Loops
Loops repeat instructions automatically.
Here the loop creates twenty flowers without writing twenty separate commands.
Final Complete Code
#Python code: Create a row of flowers
# pointing to where I'm looking
def flowers():
  vm.setDirection(Compass.SAME_AS_PLAYER)
  for count in range(20):
    vm.moveTo(1, Direction.FORWARD)
    vm.createBlock(Block.POTTED_POPPY)
Try It Yourself
Now experiment with the Flower Thrower program.
- Increase the number of flowers.
- Replace the flowers with other plants.
- Create rows of torches instead of flowers.
- Create decorative paths using different blocks.
You could even use this program to decorate gardens automatically.
This concludes the Angles and Rotation section.
In the next section we will explore how to rotate structures vertically and create impressive shapes such as rainbows, balls, and curved towers.