In the previous sections of this course, you learned how to create basic shapes in Minecraft using Python commands. You created squares, circles, and other simple structures using the VisualModder coding system. These shapes appeared exactly where the robot builder started working.
But building only in one place is very limiting. Imagine trying to build an entire city in Minecraft without moving! To create more interesting projects, we must learn how to move our robot builder around the world.
In this section, we explore how to control the position of the robot and how movement commands work together with shape commands. By combining movement and shapes, we can draw pictures, build structures, and create complex designs.
Movement commands allow us to tell the robot exactly where to go before placing blocks. For example, the robot can move forward, backward, left, right, or upward before creating a shape. This allows us to place objects in precise locations.
When we combine movement commands with loops, something amazing happens. Instead of building structures one block at a time, we can build entire towers, patterns, or drawings with only a few lines of code.
Think of the robot builder as an invisible assistant in Minecraft. It listens to our instructions and places blocks exactly where we tell it. If we tell the robot to move first, the next blocks will appear in the new location.
In this section you will build two exciting projects:
- A giant smiley face drawn on the ground
- An arrow-shaped tower that grows in two directions
These projects will teach you how to move the robot around the Minecraft world and how to combine movements with shape commands. You will also learn how loops help repeat instructions many times.
By the end of this section you will be able to design large drawings and structures by carefully controlling where the robot builds. This skill is extremely important in Minecraft programming because it allows you to design almost anything you can imagine.
Concepts You Will Learn
- How to move the robot builder around the Minecraft world
- How movement commands change where blocks are created
- How to combine movement with shapes like circles and squares
- How loops repeat instructions to build larger structures
- How functions organize the instructions of a program
- How coordinates and directions control building positions
- How to design drawings using multiple shapes
Understanding Robot Movement
Before we start building our projects, we need to understand how the robot moves.
The robot builder in VisualModder always has a position in the Minecraft world. When the program begins, the robot starts where the player is standing.
Every time we use a movement command, the robot changes its position. After moving, the next shape will be created at the robot’s new location.
This means that the order of commands in a program is very important.
If we move the robot before building something, the shape appears in a different place. If we build first and move afterward, the shape appears where the robot originally started.
By carefully planning the sequence of movements and shapes, we can draw pictures or build structures in many different locations.
The moveTo Command
The most important movement command is:
vm.moveTo(steps, direction)This command tells the robot to move a certain number of blocks in a specific direction.
The command has two parts:
- steps – how far the robot moves
- direction – which way the robot moves
For example:
vm.moveTo(10, Direction.FORWARD)This tells the robot to move forward ten blocks.
Once the robot moves, the next shape command will create blocks in the new location.
Movement directions include:
- FORWARD
- BACKWARD
- LEFT
- RIGHT
- UP
- DOWN
These directions work relative to the robot’s orientation. That means “forward” is the direction the robot is currently facing.
Understanding this concept is important because it allows us to design programs that build structures in three dimensions.
Why Movement Is Important
Without movement commands, every structure would appear in the same place.
Imagine trying to draw a smiley face in Minecraft without moving the robot. You could create circles, but they would all appear on top of each other.
Movement allows us to place shapes exactly where we want them.
For example:
- Move forward to place the eyes of a smiley face
- Move backward to create the mouth
- Move upward to stack layers in a tower
By combining these movements with loops and shape commands, we can create large and complex structures with only a few instructions.
Movement and 3D Building
Minecraft is a three-dimensional world.
This means our robot can move not only across the ground but also up into the air or down underground.
When we move upward using:
vm.moveTo(1, Direction.UP)the robot climbs one block higher.
If we repeat this movement inside a loop, we can build tall towers very quickly.
Similarly, moving left or right allows us to create wide structures such as walls or drawings.
Movement is therefore one of the most powerful tools in Minecraft programming.
How Movement Works with Shape Commands
Shape commands create structures relative to the robot’s current position.
For example:
vm.createCircle(10, False, Block.STONE)This command creates a circle centered on the robot.
If we move the robot first and then create the circle, the circle will appear somewhere else.
This simple idea allows us to draw complex pictures.
In the next projects you will see how movement and shapes combine to create fun designs.
Programming Strategy
When writing Minecraft programs, it is helpful to think like an architect.
Before writing code, imagine how the structure will be built step by step.
Ask questions such as:
- Where should the robot start?
- Where should the next shape appear?
- How far must the robot move?
- Should the robot move before or after building?
By planning these steps carefully, we can write clean and efficient programs.
Now that you understand how movement works, we are ready to build our first project in this section.
In the next lesson you will create a giant smiley face using circles, squares, and movement commands.
This project will demonstrate how movement allows us to position shapes precisely in the Minecraft world.
Smiley Face Project
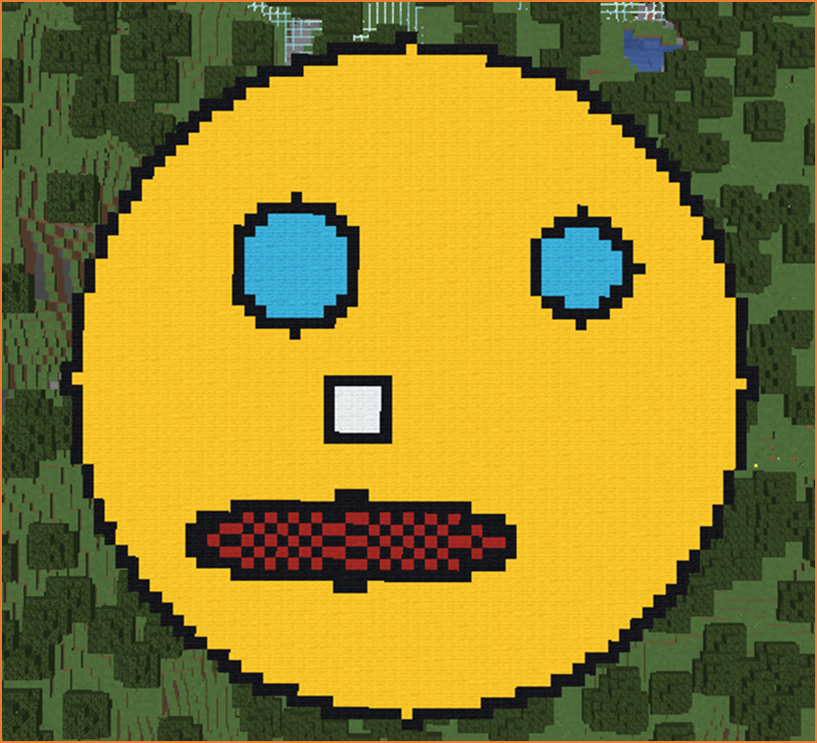
What We Will Build
In this project we will build a giant smiley face on the ground in Minecraft. The smiley face will be large enough to see from high in the sky.
The design will include several parts:
- A large yellow circular face
- A black border around the face
- Two blue eyes
- A white square for the teeth
- A curved red smile
Instead of placing every block by hand, our robot builder will create the entire smiley face automatically using a Python program.
This project teaches an important programming idea: we can move the robot before building shapes to control exactly where the shapes appear.
The robot will begin in the center of the smiley face. From there, the program moves the robot to different positions where each part of the face will be built.
By combining movements and shape commands, the program gradually draws the full picture.
How the Program Works
The program builds the smiley face step by step.
- Create a large yellow filled circle for the face.
- Create a black border circle around the face.
- Move to the position of the first eye.
- Create the first eye using a small circle.
- Move across the face to create the second eye.
- Move downward to create the teeth.
- Create a square for the teeth.
- Create a curved red smile using ellipses.
Each part of the smiley face is created using commands that build shapes relative to the robot’s position.
Because the robot moves between each step, the shapes appear exactly where they should.
Understanding the Code Step by Step
Step 1 — Creating the Function
Every VisualModder Python program begins with a function.
def smiley():A function is a group of instructions that perform a task.
Here the task is building the smiley face.
When we run the command inside Minecraft:
/vm smileythe robot executes all instructions inside this function.
Step 2 — Building the Face
The first instruction creates the yellow face.
vm.createCircle(30, True, [dict(GROUND=True, TYPE=Block.YELLOW_WOOL)])This command uses the VisualModder function:
vm.createCircle(radius, filled, block)Let’s understand the parameters.
- 30 – The radius of the circle.
- True – The circle is filled.
- Block.YELLOW_WOOL – The material used for the face.
The option GROUND=True means the blocks will be placed on the ground automatically.
This creates a large yellow circle on the terrain.
Step 3 — Adding the Face Border
Next we add a black border around the face.
vm.createCircle(30, False, [dict(GROUND=True, TYPE=Block.BLACK_WOOL)])This circle has the same radius as the first one, but it is not filled.
The result is a thin black outline around the yellow face.
Step 4 — Moving to the First Eye
Now the robot moves to where the first eye should be.
vm.moveTo(10, Direction.FORWARD)This moves the robot ten blocks forward.
Then the robot moves to the right.
vm.moveTo(15, Direction.RIGHT)This places the robot exactly where the first eye should be.
Because shapes are always created relative to the robot’s current position, moving the robot first is essential.
Step 5 — Creating the First Eye
Now we create the eye.
vm.createCircle(5, True, [dict(GROUND=True, TYPE=Block.LIGHT_BLUE_WOOL)])This creates a filled circle with radius 5 using light blue wool.
Next we add the eye border.
vm.createCircle(5, False, [dict(GROUND=True, TYPE=Block.BLACK_WOOL)])The border makes the eye easier to see.
Step 6 — Moving to the Second Eye
The robot now moves across the face to the position of the second eye.
vm.moveTo(25, Direction.LEFT)This movement crosses the center of the face and reaches the opposite eye position.
Step 7 — Creating the Second Eye
The same commands are used again.
vm.createCircle(6, True, [dict(GROUND=True, TYPE=Block.LIGHT_BLUE_WOOL)])This creates the filled eye.
vm.createCircle(6, False, [dict(GROUND=True, TYPE=Block.BLACK_WOOL)])Then the black border is added.
Step 8 — Moving to the Teeth
Next we position the robot for the teeth.
vm.moveTo(5, Direction.RIGHT)vm.moveTo(12, Direction.BACKWARD)The robot moves toward the bottom center of the face.
Step 9 — Creating the Teeth
The teeth are created using squares.
vm.createSquare(6, True, [dict(GROUND=True, TYPE=Block.WHITE_WOOL)])This command creates a filled square made of white wool.
Then we add a black border around the square.
vm.createSquare(6, False, [dict(GROUND=True, TYPE=Block.BLACK_WOOL)])This gives the teeth a cartoon style appearance.
Step 10 — Moving to the Smile
The robot moves slightly backward.
vm.moveTo(12, Direction.BACKWARD)This places the robot where the curved smile should begin.
Step 11 — Creating the Smile
The smile uses ellipses instead of circles.
vm.createEllipse(15, 4, True, [dict(GROUND=True, TYPE=Block.RED_WOOL), dict(GROUND=True, TYPE=Block.BLACK_WOOL)])An ellipse is like a stretched circle.
The parameters define its width and height.
Finally a border ellipse is added.
vm.createEllipse(15, 4, False, [dict(GROUND=True, TYPE=Block.BLACK_WOOL)])This completes the smile.
Understanding Important Commands
Here are some key commands used in this project.
vm.createCircle
This command creates circular shapes made of blocks.
It is commonly used for faces, towers, and decorative patterns.
vm.createSquare
This command creates square shapes.
Squares are useful for floors, walls, and patterns.
vm.createEllipse
This command creates oval shapes.
Ellipses are perfect for smiles, arches, and curved designs.
vm.moveTo
This command moves the robot builder.
Movement commands allow us to place shapes exactly where we want them.
Final Complete Code
#Python code: Create a big smiley face
def smiley():
  vm.createCircle(30, True, [dict(GROUND=True, TYPE=Block.YELLOW_WOOL)])
  vm.createCircle(30, False, [dict(GROUND=True, TYPE=Block.BLACK_WOOL)])
  vm.moveTo(10, Direction.FORWARD)
  vm.moveTo(15, Direction.RIGHT)
  vm.createCircle(5, True, [dict(GROUND=True, TYPE=Block.LIGHT_BLUE_WOOL)])
  vm.createCircle(5, False, [dict(GROUND=True, TYPE=Block.BLACK_WOOL)])
  vm.moveTo(25, Direction.LEFT)
  vm.createCircle(6, True, [dict(GROUND=True, TYPE=Block.LIGHT_BLUE_WOOL)])
  vm.createCircle(6, False, [dict(GROUND=True, TYPE=Block.BLACK_WOOL)])
  vm.moveTo(5, Direction.RIGHT)
  vm.moveTo(12, Direction.BACKWARD)
  vm.createSquare(6, True, [dict(GROUND=True, TYPE=Block.WHITE_WOOL)])
  vm.createSquare(6, False, [dict(GROUND=True, TYPE=Block.BLACK_WOOL)])
  vm.moveTo(12, Direction.BACKWARD)
  vm.createEllipse(15, 4, True, [dict(GROUND=True, TYPE=Block.RED_WOOL), dict(GROUND=True, TYPE=Block.BLACK_WOOL)])
  vm.createEllipse(15, 4, False, [dict(GROUND=True, TYPE=Block.BLACK_WOOL)])
Try It Yourself
Now it is your turn to experiment with the smiley face program.
- Change the color of the face.
- Make the eyes bigger.
- Add eyebrows.
- Create a surprised face.
- Create a sad face.
You can also change the radius of the main circle to make the smiley face much bigger.
Programming is about creativity, so feel free to experiment.
In the next project you will build an arrow-shaped tower using loops and movement commands.
Arrow Tower Project
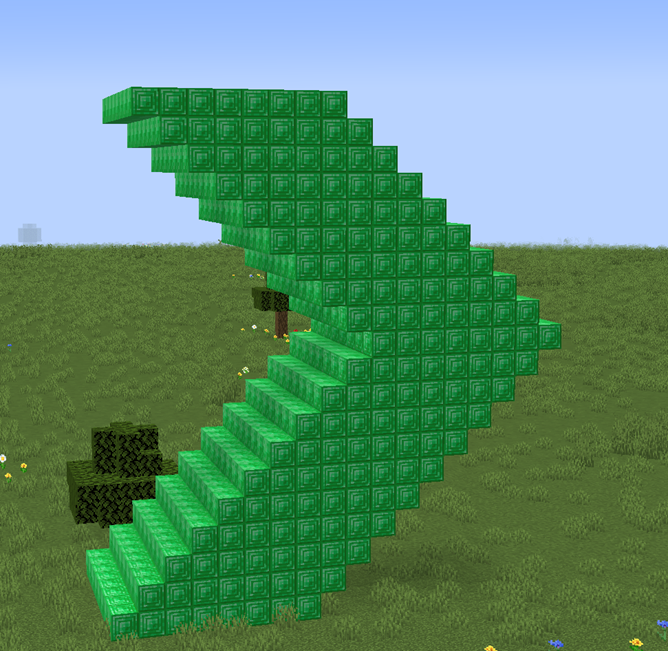
What We Will Build
In this project we will build a tower shaped like a giant arrow made of emerald blocks.
This structure is very interesting because the tower does not grow straight upward. Instead, the tower slowly moves forward while it grows. Then a second tower grows in the opposite direction.
When both towers are finished, they form the shape of a large arrow pointing in two directions.
This project teaches a powerful idea in programming: movement combined with loops can create complex structures.
Instead of writing many instructions to build each level of the tower, we use loops to repeat the same steps many times.
The robot builder will:
- Create a square layer of emerald blocks
- Move upward one block
- Move forward or backward
- Repeat these steps many times
Because the robot moves between each layer, the tower gradually shifts position as it grows.
The result is a diagonal tower that looks like part of an arrow.
After that, the program creates a second tower moving in the opposite direction.
How the Program Works
The program builds the arrow in several stages.
- Move the robot away from the player.
- Create the first tower that grows forward.
- Create the second tower that grows backward.
Each tower is built using a loop that repeats ten times.
Inside each loop, the robot creates a square layer and then moves before creating the next layer.
This movement causes the tower to shift sideways as it grows.
The final structure resembles a large arrow made of emerald blocks.
Understanding the Code Step by Step
Step 1 — Creating the Function
Every VisualModder Python program begins with a function definition.
def arrow():A function groups instructions together.
This function contains all the steps required to build the arrow tower.
When we type the command in Minecraft:
/vm arrowthe robot builder runs the instructions inside this function.
Step 2 — Moving Away from the Player
The program begins by moving the robot forward.
vm.moveTo(10, Direction.FORWARD)This command moves the robot ten blocks forward.
Why do we do this?
Because if the tower is created directly on top of the player, we could get stuck inside the structure.
Moving the robot away ensures that the structure appears in front of the player instead of around them.
Step 3 — Starting the First Loop
Now we begin building the first tower.
for count in range(10):This is a loop.
A loop repeats the instructions inside it several times.
In this case, the instructions run ten times.
Each repetition creates one layer of the tower.
Because the tower has ten repetitions, the tower will have ten levels.
Step 4 — Creating a Square Layer
Inside the loop, the robot first creates a square layer.
vm.createSquare(8, False, Block.EMERALD_BLOCK)The VisualModder command used here is:
vm.createSquare(size, filled, block)Let’s understand the parameters.
- 8 – The size of the square.
- False – The square is not filled.
- Block.EMERALD_BLOCK – The material used.
This creates a square ring made of emerald blocks.
Each ring becomes one layer of the tower.
Step 5 — Moving Upward
After creating the square layer, the robot moves upward.
vm.moveTo(1, Direction.UP)This command moves the robot one block higher.
This prepares the robot to create the next level of the tower.
Without this movement, every square would appear in the same place.
Instead, the tower grows vertically.
Step 6 — Moving Forward
Next the robot moves forward.
vm.moveTo(1, Direction.FORWARD)This small movement causes the tower to shift forward slightly.
Because this movement happens during every loop repetition, the tower gradually moves forward as it grows.
The result is a diagonal tower.
Step 7 — Creating the Second Tower
After the first tower is finished, the program creates a second tower.
This tower is almost identical to the first one.
However, instead of moving forward, the robot moves backward.
This creates a mirrored tower in the opposite direction.
Step 8 — Starting the Second Loop
The second tower also uses a loop.
for count2 in range(10):This loop again repeats ten times.
Each repetition builds another level of the tower.
Step 9 — Creating the Square Layers Again
Inside the loop the robot builds the same square layer.
vm.createSquare(8, False, Block.EMERALD_BLOCK)This creates the emerald square for the tower level.
Step 10 — Moving Upward Again
The robot moves up to the next level.
vm.moveTo(1, Direction.UP)This keeps the tower growing vertically.
Step 11 — Moving Backward
Instead of moving forward, the robot now moves backward.
vm.moveTo(1, Direction.BACKWARD)This causes the tower to grow in the opposite direction.
The result is a mirrored diagonal tower.
Together, the two towers form the shape of a giant arrow.
Understanding the Python Syntax
Let’s review the key programming concepts used in this project.
Functions
Functions group instructions together so they can be executed as one command.
The function name becomes the command you run inside Minecraft.
Loops
Loops repeat instructions automatically.
Without loops, we would need to write the same instructions many times.
Loops make programs shorter and easier to understand.
Movement Commands
Movement commands change the robot’s position.
Common directions include:
- FORWARD
- BACKWARD
- LEFT
- RIGHT
- UP
- DOWN
These commands allow us to build structures in three dimensions.
Shape Commands
Commands like vm.createSquare generate geometric shapes made of Minecraft blocks.
By combining shapes with movement, we can design complex structures.
Final Complete Code
#Python code: Create a tower in the shape of an arrow
def arrow():
  vm.moveTo(10, Direction.FORWARD)
  for count in range(10):
    vm.createSquare(8, False, Block.EMERALD_BLOCK)
    vm.moveTo(1, Direction.UP)
    vm.moveTo(1, Direction.FORWARD)
  for count2 in range(10):
    vm.createSquare(8, False, Block.EMERALD_BLOCK)
    vm.moveTo(1, Direction.UP)
    vm.moveTo(1, Direction.BACKWARD)
Try It Yourself
Now it is time to experiment with your arrow tower program.
- Increase the loop count to build a taller tower.
- Use different block types like gold or diamond.
- Add more towers to create a star shape.
- Create arrows pointing in different directions.
You can even place several arrow towers next to each other to create a huge compass pointing north, south, east, and west.
In the next sections of this course, you will learn how to rotate the robot and create structures using angles.